The post 5 Bed Exercises That Restore Posture Faster Than Physical Therapy After 60 appeared first on Eat This Not That.
]]>When I work with clients who want to improve posture, we don’t jump straight into complicated routines or long sessions. We start by restoring control of the muscles that support the spine. Many of those muscles live in the core, hips, and upper back, and they respond best to slow, intentional movement rather than rushed repetitions. Bed-based exercises are especially useful here because they provide support, reduce strain, and allow you to focus on how each movement feels, often times before your day even begins.
There’s also a big confidence factor that comes into play. When movements feel approachable and comfortable, people are more likely to stick with them. That consistency is what drives change. A short routine performed regularly can help retrain posture, improve alignment, and make standing and moving feel more natural again.
The five exercises below focus on strengthening the muscles that support posture while encouraging the body to move with better alignment. Perform them consistently, and you’ll begin to notice a more upright position, smoother movement, and a body that feels more supported throughout the day.
One quick note before jumping in. This routine is meant to support better movement and posture, not replace professional care. By no means should you stop seeking a physical therapist, and this information is not intended to fill that role. Think of these exercises as a helpful addition to your daily routine that keeps your body moving in the right direction.
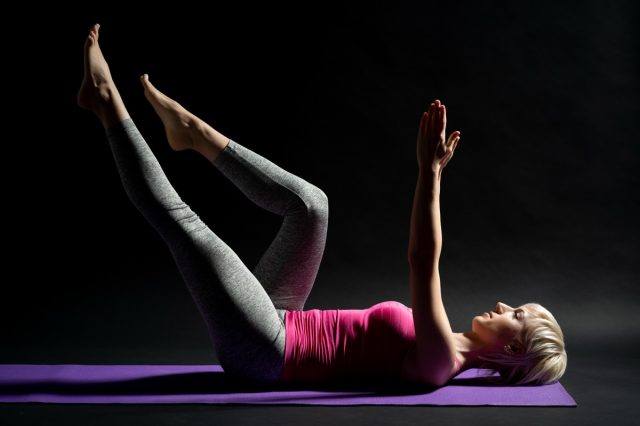
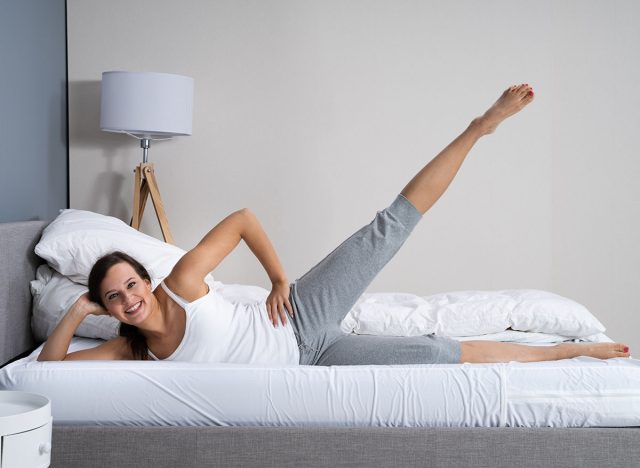
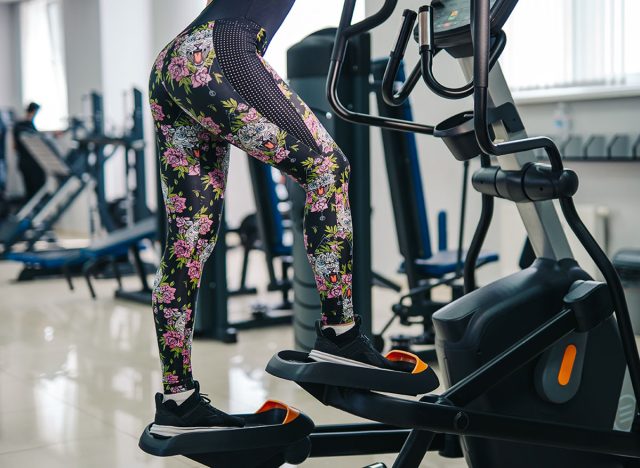
Glute Bridge Holds
Glute bridge holds help restore strength in the glutes and hips, which play a major role in supporting proper posture. When the glutes are active, they help position the pelvis correctly, which influences spinal alignment. Holding the top position encourages sustained muscle engagement rather than quick repetitions. This allows the body to build endurance in the muscles that support posture. Over time, stronger glutes contribute to a more stable and upright position.
Muscles Trained: Glutes, hamstrings, and core stabilizers.
How to Do It:
- Lie on your back with your knees bent and your feet flat on the bed.
- Place your arms at your sides for support.
- Press through your heels and lift your hips upward.
- Squeeze your glutes and hold the top position.
- Lower your hips back down with control.
Recommended Sets and Reps: Perform 3 sets of 20 to 30 second holds. Rest for 45 seconds between each set.
Best Variations: Single-leg hold, extended hold, banded hold.
Form Tip: Keep your ribs down and avoid arching your lower back at the top.
RELATED: 5 Daily Exercises That Flatten Belly Overhang Faster Than Crunches After 60
Alternating Dead Bugs
Alternating dead bugs strengthen the deep core muscles that help stabilize the spine. The movement requires the core to stay engaged while the arms and legs move in opposite directions. This coordination helps train the body to maintain alignment during movement. Many people find this exercise improves their awareness of how to control their core. With consistent practice, it supports better posture and spinal stability.
Muscles Trained: Transverse abdominis, rectus abdominis, and hip flexors.
How to Do It:
- Lie on your back with your arms extended toward the ceiling.
- Bring your knees into a tabletop position.
- Brace your core and gently press your lower back into the bed.
- Extend one arm and the opposite leg toward the bed.
- Return to the starting position and alternate sides.
Recommended Sets and Reps: Perform 3 sets of 10 to 12 reps per side. Rest for 45 seconds between each set.
Best Variations: Heel taps, slow tempo dead bugs, pause dead bugs.
Form Tip: Keep your lower back lightly pressed into the bed throughout the movement.
Cat-Cows
Cat-cows encourage the spine to move through flexion and extension in a controlled way. This movement helps improve spinal mobility while increasing awareness of posture. Many people spend long periods in one position, which can make the spine feel stiff. Moving between these two positions helps loosen the back and promote better alignment. Over time, this exercise supports a more natural and comfortable posture.
Muscles Trained: Spinal stabilizers, core, and upper back muscles.
How to Do It:
- Begin on all fours with your hands under your shoulders and knees under your hips.
- Inhale as you drop your belly and lift your chest.
- Exhale as you round your back and tuck your chin.
- Move slowly between each position.
- Continue for controlled repetitions.
Recommended Sets and Reps: Perform 3 sets of 10 to 12 reps. Rest for 30 seconds between each set.
Best Variations: Slow tempo cat-cow, extended hold cat-cow, segmented cat-cow.
Form Tip: Move slowly and focus on feeling each segment of your spine.
RELATED: 5 Chair Exercises That Restore Full-Body Balance Faster Than Yoga After 65
Supine Leg Drops
Supine leg drops challenge the core to stabilize the pelvis while the legs move. Lowering the legs requires the abdominal muscles to control the motion and prevent the lower back from arching. This helps strengthen the muscles that support proper spinal alignment. Many people notice that this exercise quickly engages the lower core. Regular practice contributes to better posture and core control.
Muscles Trained: Lower abdominals, hip flexors, and core stabilizers.
How to Do It:
- Lie on your back with your legs extended toward the ceiling.
- Place your hands at your sides for support.
- Brace your core and press your lower back into the bed.
- Lower one leg toward the bed with control.
- Return to the starting position and alternate legs.
Recommended Sets and Reps: Perform 3 sets of 10 reps per leg. Rest for 45 seconds between each set.
Best Variations: Double leg drop, slow tempo drop, pause drop.
Form Tip: Lower your leg only as far as you can while keeping your lower back stable.
Quadruped Scapula Circles
Quadruped scapula circles target the muscles around the shoulder blades, which are essential for maintaining upright posture. This movement encourages controlled shoulder movement without relying on the arms alone. Many people carry tension in the upper back and shoulders, which can contribute to a rounded posture. This exercise helps improve control and awareness in that area. Over time, it supports better shoulder positioning and upper-body alignment.
Muscles Trained: Upper back, shoulders, and scapular stabilizers.
How to Do It:
- Begin on all fours with your hands under your shoulders.
- Keep your arms straight and your core engaged.
- Slowly move your shoulder blades in a circular motion.
- Complete several circles in one direction.
- Reverse the direction and repeat.
Recommended Sets and Reps: Perform 3 sets of 6 to 8 circles per direction. Rest for 30 seconds between each set.
Best Variations: Slow scapula circles, segmented circles, pause circles.
Form Tip: Keep your arms straight and let the movement come from your shoulder blades.
RELATED: If You Can Hold a Wall Sit This Long After 60, Your Leg Strength Is Top-Tier
Daily Strategies to Help Reinforce Better Posture After 60
Improving posture involves more than just a few exercises. It requires consistent movement, awareness, and small adjustments throughout the day. The body adapts to the positions it spends the most time in, which means daily habits play a major role in maintaining alignment.
- Move regularly throughout the day: Frequent movement helps prevent stiffness and encourages better positioning.
- Stay aware of your posture: Sitting and standing tall helps reinforce proper alignment.
- Strengthen supporting muscles: The core, glutes, and upper back all contribute to posture.
- Focus on controlled movement: Slow, intentional exercises improve muscle activation and awareness.
- Stay consistent with your routine: Regular practice allows posture improvements to build over time.
Stick with these strategies and exercises, and your posture will begin to feel more natural, supported, and comfortable as the weeks go on.
The post 5 Bed Exercises That Restore Posture Faster Than Physical Therapy After 60 appeared first on Eat This Not That.
]]>The post 5 Exercises Personal Trainers Recommend for Clients Over 60 Who Haven’t Worked Out in Years appeared first on Eat This Not That.
]]>RELATED: 5 Standing Exercises That Build Walking Endurance Faster Than Treadmills After 65
The Challenges of Coming Back

The two most common physical roadblocks I see are limited joint mobility and reduced balance. Extended periods of inactivity lead to stiffness, particularly in the hips, shoulders, and ankles. The body’s ability to sense its position in space, what’s called proprioception, can also diminish, which raises the risk of falls in early training.
On the mental side, fear of injury holds a lot of people back. Many clients hesitate to push themselves because they’re worried about “breaking” something or causing long-term pain. Another pattern I see regularly is the comparison trap: getting caught up in measuring your current physical abilities against what you could do 20 or 30 years ago. That kind of thinking leads to unnecessary frustration and, more importantly, it misses the point.
Why Functional Movement Comes First
For people over 60, the fitness conversation should start with quality of life and build from there. Functional movements mimic everyday actions: sitting down, standing up, carrying groceries, reaching for something on a shelf. That’s the foundation. Everything else follows.
RELATED: If You Can Hold a Bridge This Long After 55, Your Core Strength Is Top-Tier
Sit-to-Stands
This is the functional squat, and it’s where I start almost every returning client. It builds lower body strength using a built-in safety net (the chair) and directly mimics one of the most common movements in daily life.
Muscles Trained: Quadriceps, glutes, hamstrings
How to Do It:
- Stand in front of a chair with your feet between shoulder and hip width apart
- Slowly lower your hips back and down until your glutes touch the seat
- Drive through your heels and stand back up to the starting position
Avoid These Mistakes:
- Don’t let your knees cave inward at any point during the movement
- Don’t use momentum or rock forward to get yourself up; the drive should come from your legs
Recommended Sets and Reps: 2 sets of 10–12 reps, with 60–90 seconds of rest between sets
Form Tip: Once 12 reps starts to feel less challenging, add a third set before increasing any resistance.
Wall Push-Ups
This movement builds upper body strength in the chest, shoulders, arms, and core without the joint strain of a floor push-up. It’s a smart entry point for anyone who hasn’t been training their upper body, and it’s more demanding than it looks when done with proper control.
Muscles Trained: Chest, shoulders, triceps, core
How to Do It:
- Stand facing a wall with your arms extended and palms flat against the surface at shoulder width
- Slowly bend your elbows and lean in toward the wall
- Push back out to the starting position with control
Avoid These Mistakes:
- Don’t arch your lower back; keep your body in a straight line from head to heels
- Don’t shrug your shoulders toward your ears during the movement
Recommended Sets and Reps: 2 sets of 10–12 reps, with 60–90 seconds of rest between sets.
RELATED: 5 Bed Exercises That Flatten Stubborn Midsection Faster Than Crunches After 60
Bird Dogs
Bird dogs improve core strength, spinal stability, and overall coordination without any of the neck strain that comes with crunches. For clients who haven’t trained in years, this is one of the best ways to rebuild a functional core from the ground up.
Muscles Trained: Core, glutes, lower back, shoulders
How to Do It:
- Start on all fours with your hands under your shoulders and knees under your hips
- Simultaneously extend your right arm forward and your left leg back
- Hold the position for 2–3 seconds, then return to the starting position
- Switch sides with each repetition
Avoid These Mistakes:
- Don’t tilt your hips to one side; keep your pelvis level throughout
- Don’t arch your back unnecessarily; the spine should stay neutral
Recommended Sets and Reps: 2 sets of 10–12 reps per side, with 60–90 seconds of rest between sets
Farmer’s Carry
This one surprises people, but I include it specifically because grip strength and postural stability are two of the strongest indicators of longevity and fall prevention. Carrying weight while walking is also one of the most natural human movements there is.
Muscles Trained: Forearms, grip, traps, core, legs
How to Do It:
- Stand tall with your shoulders back and a weight in each hand (dumbbells work, but jugs of water are a perfectly good substitute)
- Walk in a straight line for 30 seconds using small, controlled steps
- Keep your eyes forward throughout
Avoid These Mistakes:
- Don’t slump your shoulders forward; posture is the whole point of this exercise
- Don’t look down at your feet
- No wrist wraps for this one; the grip work is essential
Recommended Sets and Reps: 2 sets of 30-second walks, with 60–90 seconds of rest between sets
Form Tip: Start with a weight you can carry confidently, but do challenge yourself here. If it feels too easy, go heavier.
RELATED: 5 Chair Exercises That Restore Leg Muscle Faster Than Squats After 65
Step-Ups
Step-ups mimic climbing stairs and build single-leg strength and stability, two things that matter enormously for independent daily function. The first step of a staircase is all you need.
Muscles Trained: Quadriceps, glutes, hamstrings, calves
How to Do It:
- Stand at the bottom of a staircase; use the railing for balance if needed
- Step up with your right foot and bring your left foot up to meet it
- Step back down and repeat for a full set leading with the right leg
- Then complete a second set leading with the left leg
Avoid These Mistakes:
- Don’t stare at the ground; keep your gaze forward
- Don’t lean too far forward as you step up; stay upright
Recommended Sets and Reps: 2 sets of 10–12 reps per leg, with 60–90 seconds of rest between sets.
How To Structure Your Weekly Routine
Early on, consistency matters more than intensity. That’s not a cliché; it’s how the body adapts. Here’s the framework I’d recommend:
- Frequency: 3 days per week (Monday, Wednesday, Friday works well) to allow for rest and recovery between sessions
- Sets and reps: 2 sets of 10–12 reps for each exercise; for the farmer’s carry, do 2 sets of 30-second walks
- Rest: 60–90 seconds between sets
- Progression: Once 12 reps starts to feel manageable, add a third set before increasing weight.
RELATED: 5 Dumbbell Exercises That Build Shoulder Strength Faster Than Machines After 60
What To Expect in the First 4–6 Weeks
If you’re consistent and doing these movements with good form, here’s what you can realistically expect:
- Mobility: A significant reduction in morning stiffness and a noticeable improvement in how easily you move through the day
- Strength: The movements themselves will feel easier to execute; neuromuscular control, efficiency, and overall confidence will all improve
- Energy: Better circulation and improved oxygen flow typically lead to better sleep quality and more energy throughout the day
The goal isn’t to get back to where you were. The goal is to build a stronger, more capable version of yourself right now. That’s a goal worth showing up for three times a week.
The post 5 Exercises Personal Trainers Recommend for Clients Over 60 Who Haven’t Worked Out in Years appeared first on Eat This Not That.
]]>The post 5 Bed Exercises That Restore Back Strength Faster Than Physical Therapy After 60 appeared first on Eat This Not That.
]]>I’m a personal trainer and fitness educator at TRAINFITNESS, and I’ve been working in the fitness industry for 40 years. Back weakness is one of the most common issues I see in people over 60, and it affects nearly every aspect of daily life. The good news is that rebuilding back strength doesn’t require a gym membership or complicated equipment. Some of the most effective exercises can be done right in your bed before you even start your day.
Why Back Strength Fades After 60
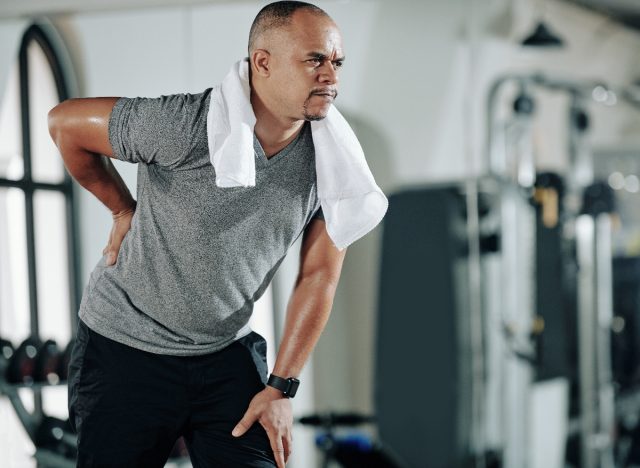
The most common issue is weakness in the erector spinae, the muscles that run along your spine, and the latissimus dorsi, the large muscles on the sides of your back. When these muscles weaken, everything becomes harder. Getting out of bed takes longer. Standing up straight feels like work. Lifting shopping bags or reaching for something on a high shelf becomes a challenge.
This weakness doesn’t happen overnight. It builds gradually over years of reduced activity. We start sitting more, moving less, and our backs simply stop getting the stimulus they need to stay strong. The muscles atrophy, and the supporting structures around the spine become less stable.
Recovery is slow for older adults because muscle protein synthesis, the process by which your body builds new muscle, slows down with age. Younger people can bounce back from inactivity quickly. For someone over 60, it takes longer and requires more consistency. The body still responds to exercise, but it needs regular stimulus and adequate recovery time between sessions.
Pain also plays a role. Many older adults have experienced back pain at some point and have developed a fear of movement. They start avoiding activities that might aggravate their back, which creates a vicious cycle. Less movement leads to weaker muscles, which leads to more vulnerability and more pain.
RELATED: The 6-Minute Chair Routine That Builds Leg Muscle Faster Than Squats After 60
Why Bed Exercises Work So Well
Bed-based exercises work because they remove most of the barriers that stop older adults from exercising consistently. There’s no need to get dressed, drive to a gym, or worry about people watching. You can do them immediately when you wake up, which means you’re more likely to actually do them.
The surface of a bed provides just enough instability to engage your core and stabiliser muscles without being dangerous. You’re not on a hard floor where discomfort might stop you mid-exercise, but you’re also not on something so soft that the exercises become ineffective. This balance makes bed exercises accessible for people who find floor work too challenging.
Bed exercises are also low-impact. Traditional back exercises often involve standing or complex movements that require good balance and coordination. If you’re already dealing with back weakness, these movements can feel risky. Bed exercises start from a supported position, which builds confidence while still providing effective stimulus for the muscles.
The other advantage is progression. You can start with very basic movements and gradually increase difficulty without needing new equipment or changing location. When exercise feels simple and convenient, it’s much more likely to become part of your daily routine.
Prone Shoulder Blade Squeeze
This targets the rhomboids and mid-trapezius muscles between your shoulder blades. These muscles pull your shoulders back and help maintain upright posture. When they’re weak, your shoulders round forward and your upper back curves.
Muscles Trained: Rhomboids, mid-trapezius
How to Do It:
- Lie face down on your bed with your arms by your sides
- Squeeze your shoulder blades together as if you’re trying to hold a pencil between them
- Hold the squeeze for 3 to 5 seconds, then release
- Keep your arms relaxed throughout; the movement happens in your upper back, not your neck or shoulders
Recommended Sets and Reps: 2 sets of 10 repetitions, resting 30 seconds between sets
Common Mistakes to Avoid:
- Lifting your head or tensing your neck; your face should stay down throughout
- Letting the work drift into your neck or shoulders rather than your shoulder blades; if you feel tension in your neck, you’re doing it wrong.\
RELATED: If You Can Hold a Squat This Long After 60, Your Lower-Body Strength Is Top-Tier
Supine Arm Raises
This works the latissimus dorsi and strengthens the muscles responsible for pulling movements. It also improves shoulder mobility, which often becomes restricted when back muscles are weak.
Muscles Trained: Latissimus dorsi, shoulder stabilisers
How to Do It:
- Lie on your back with your knees bent and feet flat on the bed
- Start with your arms by your sides
- Slowly raise both arms overhead, keeping them as straight as comfortable, until they’re resting on the bed above your head
- Pause for a second, then bring them back down to your sides
- Keep the movement controlled and smooth throughout
Recommended Sets and Reps: 2 sets of 12 repetitions, resting 30 seconds between sets
Common Mistakes to Avoid:
- Arching your lower back as your arms go overhead; your lower back should stay in contact with the bed throughout
- If your lower back lifts, your core isn’t properly engaged and you’re compensating with your back instead of using your shoulder and upper back muscles.
Prone Back Extension (Superman Hold)
This directly targets the erector spinae muscles that run along your spine. These muscles are responsible for keeping you upright and preventing your spine from rounding forward. Weakness here is one of the main reasons people struggle to stand up straight.
Muscles Trained: Erector spinae, lower back
How to Do It:
- Lie face down with your arms extended above your head
- Lift your chest and arms slightly off the bed while keeping your legs down
- You’re not trying to lift high, just enough to feel your lower back muscles working
- Hold for 5 to 10 seconds, then lower back down
Recommended Sets and Reps: Start with 2 sets of 6 repetitions, holding each for 5 seconds; as you get stronger, increase the hold time to 10 seconds
Common Mistakes to Avoid:
- Lifting too high and hyperextending the lower back; this exercise isn’t about how far you can lift
- A small lift where you feel your back muscles working is far more effective than straining to go higher.
RELATED: 5 Standing Exercises That Shrink Stubborn Waist Thickening Faster Than Cardio After 60
Bridge Hold
While primarily known as a glute exercise, the bridge also works the erector spinae and helps coordinate the muscles along the back of your body. When your glutes and back work together properly, it takes pressure off your lower back during everyday movements.
Muscles Trained: Erector spinae, glutes, core
How to Do It:
- Lie on your back with your knees bent and feet flat on the bed, hip-width apart
- Push through your heels and lift your hips until your body forms a straight line from your shoulders to your knees
- Squeeze your glutes and keep your core tight
- Hold for 10 to 15 seconds, then lower back down
Recommended Sets and Reps: 2 sets of 8 repetitions, holding each for 10 to 15 seconds, resting 30 seconds between sets
Common Mistakes to Avoid:
- Pushing your hips too high and overarching your lower back; you want a straight line from shoulders to knees, not a curve
- If your lower back feels pinched or uncomfortable, you’ve gone too high; lower slightly until you feel your glutes and back working without strain.
Cat-Cow Stretch (Modified Bed Version)
This isn’t purely a strengthening exercise, but it’s important for back health. It mobilises the spine, stretches tight muscles, and helps coordinate movement through your entire back. Many older adults have stiff spines that limit their ability to perform daily activities comfortably.
Muscles Trained: Full spinal stabilisers, erector spinae, core
How to Do It:
- Get on your hands and knees on the bed; the cushioning makes this easier on your knees than doing it on the floor
- Start in a neutral position with your back flat
- Slowly arch your back, dropping your belly toward the bed and lifting your head and tailbone; this is cow. Hold for 2 seconds
- Then round your back, tucking your chin to your chest and pulling your belly button toward your spine; this is cat. Hold for 2 seconds
- Move slowly and smoothly between positions
Recommended Sets and Reps: 2 sets of 10 repetitions
Common Mistakes to Avoid:
- Rushing through the movement; this isn’t about speed, it’s about controlled, deliberate movement through your entire spine
- Each position should take 2 to 3 seconds, with a smooth transition between them; if you’re moving quickly, you’re not getting the benefit.
RELATED: The 8-Minute Daily Routine That Builds More Core Strength Than Planks After 65
How to Fit This Into Your Day

The best time to do these exercises is first thing in the morning, before you get out of bed. This removes any excuse about not having time or forgetting. The entire routine takes less than 10 minutes. Do it every other day to start, giving your muscles time to recover between sessions. As you get stronger, you can do it daily if you want.
Start with just one set of each exercise for the first week. This lets your body adapt without overwhelming it. In week two, add the second set. By week three, you should be doing the full routine comfortably.
Stop immediately if you feel sharp, shooting pain. Muscle fatigue is normal and expected. A burning sensation in the working muscles is fine. But pain that feels like something is wrong, sharp, stabbing, or radiating down your legs, is a sign to stop.
Check with a doctor before starting if you have any of the following: diagnosed osteoporosis, recent back surgery or injury, herniated discs, severe arthritis, uncontrolled high blood pressure, or any condition where lying flat or bending causes significant pain.
Other warning signs to watch for include dizziness during the exercises, numbness or tingling in your legs, or pain that gets worse rather than better over several days.
What to Expect After 4 to 6 Weeks

After two weeks, you’ll find it easier to perform daily activities such as getting out of bed or standing from a seated position. You might not notice any real visual changes yet, but you’ll be functioning better.
After four weeks, you’ll notice you’re standing more upright with less strain on your back during activities that previously caused discomfort. You’ll also feel more confident in the way you move because your back is feeling more stable.
After six weeks, you should notice genuine strength gains. Carrying groceries or doing gardening shouldn’t feel as stressful, and you’ll find it easier to maintain good posture throughout the day.
RELATED: If You Can Hold a Plank This Long After 60, Your Core Strength Is Stronger Than 90% of Peers
The Four Things That Actually Drive Results

How well you adhere to the programme is the key factor. Exercising three times a week and then stopping for two weeks won’t bring the results you want. Your muscles need to be continually stimulated to get stronger. Even every other day, done consistently, beats sporadic bursts followed by long gaps.
Progression is the second element. If the exercises become easy, make them a little more challenging. Add another set, increase the hold time, or slow the movement down to increase the time your muscles are working. Your muscles adapt to what you challenge them with; if you keep doing the same exercises at the same intensity without any change, you won’t continue to progress.
Recovery is the third element. Sleep, nutrition, and stress all impact how quickly your muscles rebuild. If you’re not getting enough sleep or eating enough protein, recovery slows down. The daily protein requirement for older adults is 1.2 to 1.6 grams per kilogram of body weight to maintain and build muscle mass.
Finally, be patient. Muscle function won’t improve overnight, especially after 60. With consistent effort you’ll notice improvements after six weeks, but it takes months to make real changes. The people who succeed are the ones who understand this is a long-term process, not a quick fix.
The post 5 Bed Exercises That Restore Back Strength Faster Than Physical Therapy After 60 appeared first on Eat This Not That.
]]>The post The 5-Minute Standing Routine That Restores Posture After 60, According to a Trainer appeared first on Eat This Not That.
]]>Now that you’re probably straightening your back while reading this, we’re here with something better. We spoke with Corryne Hart, BASI Pilates, NCPT, Club Pilates Master Trainer, who shares a five-minute standing routine you can try that restores posture after 60.
“As we get older, it’s common for posture to change because the muscles that support our spine naturally lose strength. Spinal discs start to shrink and joints can stiffen, which often leads to a rounded upper back and forward head. The good news is that gentle movement, like Pilates, can help strengthen muscles, improve mobility, and help the body stand taller and feel more supported,” Hart tells us. “Even just a few minutes of standing Pilates each day can make a big difference in improving posture. These exercises engage your whole postural system, from your feet and legs to your glutes, core, and back, helping your body relearn how to support itself while upright.”
Below, Hart breaks down a five-minute workout that helps restore posture after 60. Have a sturdy chair nearby to hold onto for balance. Begin each exercise with your feet hip-distance apart, gently tighten your midsection, and roll your shoulders back and down.
Standing Chest Expansion
- From the start position, bring your arms slightly behind your body with your palms facing back.
- Breathe out as you press your arms back, lift through the chest, and draw your shoulders back and down.
- Breathe in to release your hands forward.
- Repeat for 10 reps.
RELATED: 5 Easy Bodyweight Tests That Show Your Real Fitness After 45
Standing Leg Raises
- From the start position, bring your arms out to form a “T” position and pull your ribs in.
- Shift your body weight onto one leg, softening into your knee.
- Breathe out to lift the opposite leg slightly out to the side.
- Inhale as you return the leg back to the start position.
- Exhale to lift the leg slightly behind you.
- Alternate between the two movements 10 times before switching sides. Maintain a steady, upright torso.
RELATED: These 5 Daily Moves Reverse Muscle Loss Faster Than Gym Workouts After 45
Heel Raises With Arm Lifts
- From the start position, bring your arms out to form a “T” as you gently pull your ribcage in.
- Breathe out and lift your heels off the ground.
- Lower your heels with control.
- Repeat 10 times.
RELATED: If You Can Do These 3 Balance Tests at 60, Your Body Age Is 20 Years Younger
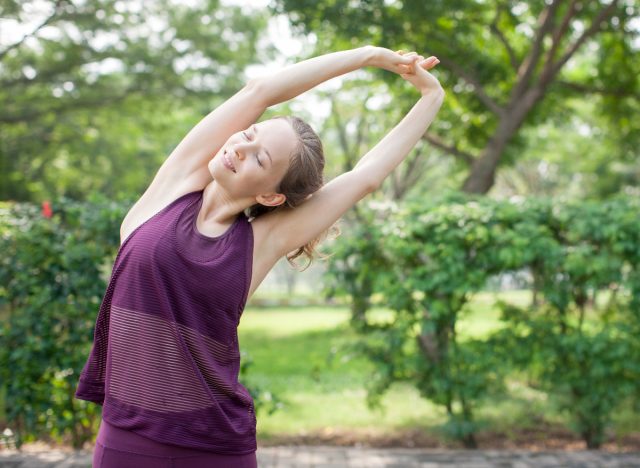
Side Bends
- From the start position, interlace your hands behind your head as you gently pull your ribcage in.
- Exhale and bend gently to one side, reaching your elbow toward the ground.
- Inhale as you return to standing.
- Alternate sides and repeat 10 times on each side.
RELATED: If You Can Hold a Plank This Long After 50, Your Core Is Stronger Than Most
Spine Twist With Knee Raise
- From the start position, interlace your hands behind your head and gently pull your ribcage in.
- Rotate your torso a few inches to one side, then pause.
- Lift the same-side knee in a gentle marching motion.
- Inhale as you return your foot to the floor.
- Untwist back to the center.
- Repeat 10 times before switching sides.
The post The 5-Minute Standing Routine That Restores Posture After 60, According to a Trainer appeared first on Eat This Not That.
]]>The post 5 Daily Exercises That Restore Hip Mobility Faster Than Floor Stretches After 55 appeared first on Eat This Not That.
]]>After years of coaching athletes and everyday clients, I’ve seen how quickly the hips respond when you give them proper movement prescriptions. Many people assume the answer is to lie on the floor and do long stretches. Stretching has its place, yet the hips often improve faster when they move through strength-based positions that encourage the joints to work through their full range of motion. Plus, many people would rather move than spend ten minutes staring at the ceiling while holding a stretch.
These five daily movements help the hips open up while strengthening the muscles that support them. They combine mobility, stability, and coordination so your hips learn to move freely while staying strong. Perform them consistently, and you’ll build smoother movement, stronger legs, and hips that feel a whole lot better throughout the day.
Bodyweight Deep Squat
The deep squat encourages the hips to move through a full range of motion while strengthening the surrounding muscles. Sitting in the bottom position allows the hips, knees, and ankles to work together naturally. This movement gently stretches the hips while building strength in the quads and glutes. Over time, practicing deep squats helps the joints feel more comfortable in deeper positions. Many people notice their hips start to feel looser and more stable within just a few weeks.
Muscles Trained: Quads, glutes, hamstrings, and core.
How to Do It:
- Stand with your feet slightly wider than shoulder width.
- Brace your core and push your hips back.
- Lower your body into a deep squat position.
- Keep your chest tall and your heels grounded.
- Stand back up by driving through your heels.
Recommended Sets and Reps: Perform 3 sets of 10 to 12 reps. Rest for 45 seconds between each set.
Best Variations: Goblet deep squat, pause squat, assisted squat hold.
Form Tip: Sit your hips down between your heels rather than leaning forward.
RELATED: If You Can Hold These 3 Bed Positions After 60, Your Core Is Stronger Than 90% of Peers
Standing Hip Circles
Standing hip circles encourage the hips to move smoothly in multiple directions. Many daily movements only challenge the hips forward and backward. Circular motion allows the joint to explore a wider range of movement. This helps improve joint awareness and coordination. Over time, the hips become more comfortable moving through these larger patterns.
Muscles Trained: Hip flexors, glutes, and stabilizing muscles around the hip joint.
How to Do It:
- Stand tall while holding onto a wall or sturdy surface.
- Lift one knee to hip height.
- Slowly draw a large circle with your knee.
- Continue rotating the hip through a full circular motion.
- Reverse the direction after completing several circles.
Recommended Sets and Reps: Perform 3 sets of 6 to 8 circles per direction per leg. Rest for 30 seconds between each set.
Best Variations: Controlled hip rotations, banded hip circles, slow tempo circles.
Form Tip: Move slowly and keep your torso steady as the hip moves.
Alternating Lateral Lunges
Alternating lateral lunges strengthen the hips while improving side-to-side mobility. This movement challenges the inner thighs and glutes while encouraging the hips to move in a wider pattern. Many people feel immediate benefits in the groin and hip region after performing a few sets. The controlled shift in body weight also improves balance and coordination. Consistent practice builds stronger hips that move more comfortably in multiple directions.
Muscles Trained: Glutes, quads, inner thighs, and hips.
How to Do It:
- Stand with your feet hip-width apart.
- Step your right foot out to the side.
- Bend your knee while pushing your hips back.
- Keep your opposite leg straight and your chest tall.
- Push through your foot to return to the starting position and switch sides.
Recommended Sets and Reps: Perform 3 sets of 10 reps per side. Rest for 45 seconds between each set.
Best Variations: Weighted lateral lunge, slider lateral lunge, pause lateral lunge.
Form Tip: Sit your hips back to engage the glutes as you step sideways.
RELATED: 5 Bed Exercises That Restore Leg Strength Faster Than Squats After 60
Reverse Lunge with Reach
Reverse lunges encourage the hips to extend and flex through a controlled movement. Adding an overhead reach increases the mobility challenge while engaging the entire body. The movement stretches the hip flexors of the back leg while strengthening the front leg. This combination encourages smoother hip motion during walking and climbing. Over time, the exercise helps restore both strength and flexibility in the hips.
Muscles Trained: Glutes, quads, hip flexors, and core.
How to Do It:
- Stand tall with your feet hip-width apart.
- Step one leg backward into a reverse lunge.
- Raise both arms overhead as you lower your back knee.
- Keep your chest tall and your core engaged.
- Push through your front foot to return to standing.
Recommended Sets and Reps: Perform 3 sets of 8 to 10 reps per leg. Rest for 45 seconds between each set.
Best Variations: Dumbbell reverse lunge with reach, bodyweight overhead lunge, alternating reverse lunge.
Form Tip: Reach upward through your fingertips to open the hips and torso.
Curtsy Lunge
Curtsy lunges strengthen the hips while challenging them in a diagonal movement pattern. The crossing step activates the glutes and outer hips while encouraging stability. This movement helps train the muscles that support the pelvis during walking and single-leg activities. Many people find that it quickly improves balance and hip control. Over time, the exercise builds stronger hips that feel more stable and coordinated.
Muscles Trained: Glutes, quads, hips, and inner thighs.
How to Do It:
- Stand with your feet hip-width apart.
- Step one leg diagonally behind your body.
- Bend both knees to lower into a lunge.
- Keep your chest tall and your hips facing forward.
- Push through your front foot to return to standing.
Recommended Sets and Reps: Perform 3 sets of 8 to 10 reps per leg. Rest for 45 seconds between each set.
Best Variations: Dumbbell curtsy lunge, alternating curtsy lunge, pause curtsy lunge.
Form Tip: Keep your hips square as you step behind your body.
RELATED: 5 Standing Exercises That Flatten Stubborn Belly Pooch Faster Than Crunches After 55
Best Daily Tips for Improving Hip Mobility After 55
Healthy hips make everyday movement easier and more comfortable. When the hips move well, the knees and lower back often feel better, too. Rather than stretching your life away, improving hip mobility with well-chosen movements performed regularly can make a noticeable difference in how the body feels and moves.
- Move your hips in multiple directions: Exercises that include forward, sideways, and rotational movements help your hips stay adaptable.
- Prioritize controlled movement: Slow and steady repetitions allow the joints to move through their full range safely.
- Strengthen the surrounding muscles: Strong glutes and thighs support healthy hip mechanics.
- Stay consistent with daily movement: Short daily sessions help maintain hip mobility and strength.
- Listen to your body: Move within comfortable ranges and gradually increase depth as mobility improves.
Stick with these exercises and your hips will begin to feel stronger, looser, and more capable with every week of training.
References:
- Leem, Inhwan et al. “Impact of Hip Exercises on Postural Stability and Function in Patients with Chronic Lower Back Pain.” Diagnostics (Basel, Switzerland) vol. 15,10 1229. 13 May. 2025, doi:10.3390/diagnostics15101229
- Ehresman, Brent A et al. “Improved Hip Flexibility and Gluteal Function Following a Daily Lunge-and-Reach Stretching Intervention.” International journal of sports physical therapy vol. 20,6 814-823. 2 Jun. 2025, doi:10.26603/001c.137692
The post 5 Daily Exercises That Restore Hip Mobility Faster Than Floor Stretches After 55 appeared first on Eat This Not That.
]]>The post 4 Standing Exercises That Restore Stair-Climbing Strength Faster Than Lunges After 60 appeared first on Eat This Not That.
]]>In many cases, targeted standing exercises produce faster improvements because they strengthen the specific muscles responsible for pushing the body upward during each step. These movements allow better balance, controlled muscle activation, and less joint strain. When practiced consistently, they help rebuild the strength needed for confident stair climbing.
Another advantage of standing exercises involves their direct connection to everyday movement. Training the legs in an upright position teaches the body to generate force while maintaining balance and posture. This kind of functional strength carries over naturally to stairs, hills, and other daily activities.
The following exercises focus on strengthening the glutes, quadriceps, calves, and hip stabilizers that power every step upward. Move slowly, maintain good posture, and concentrate on engaging the working muscles throughout each repetition. With consistent practice, many people regain the strength and confidence needed to climb stairs comfortably again.
Step-Ups
Step-ups closely mimic the motion used when climbing stairs, making them one of the most effective exercises for rebuilding stair strength. I often introduce this movement early because it strengthens the quadriceps and glutes while improving coordination and balance.
Stepping onto a stable platform forces the working leg to push the entire body upward, just like climbing a stair. When performed slowly and with control, the muscles learn to generate steady power rather than relying on momentum.
How to Do It
- Stand in front of a sturdy step or low platform
- Place one foot on the step
- Push through the heel to stand up
- Step back down slowly
- Alternate legs steadily.
RELATED: 5 Exercises You Can Do in Your Bedroom That Restore Full-Body Strength After 60
Standing Calf Raises
The calf muscles play a critical role during stair climbing because they help push the body upward during the final portion of each step. Weak calves often cause fatigue during longer staircases.
I frequently add calf raises to stair-strength routines because they restore the push-off power many people lose with age. Strong calves allow the body to move upward more efficiently and reduce strain on the knees.
How to Do It
- Stand tall with feet hip-width apart
- Rise slowly onto your toes
- Pause briefly at the top
- Lower your heels with control
- Repeat steadily.
Standing Hip Extensions
Strong glutes play a major role in lifting the body upward during stair climbing. When the glutes weaken, the quadriceps must work harder, which often leads to fatigue or knee discomfort.
Standing hip extensions activate the glutes directly while improving hip stability. I often recommend this movement to clients who struggle with uphill walking or long staircases because it restores the power needed for upward movement.
How to Do It
- Stand tall while holding a chair for balance
- Extend one leg straight behind you
- Squeeze the glutes at the top
- Lower the leg slowly
- Alternate legs.
RELATED: 5 Daily Exercises Men Over 55 Should Do to Restore Lost Muscle
Standing Knee Drives
Standing knee drives strengthen the hip flexors and lower abdominal muscles while reinforcing balance. This movement trains the body to lift the leg confidently, which directly improves stair-climbing ability.
Many clients feel immediate improvements in coordination once they practice controlled knee drives regularly. The movement encourages the body to lift each step with strength rather than relying on momentum.
How to Do It
- Stand tall with feet hip-width apart
- Lift one knee toward your chest
- Tighten the core muscles
- Lower slowly
- Alternate legs steadily.
The post 4 Standing Exercises That Restore Stair-Climbing Strength Faster Than Lunges After 60 appeared first on Eat This Not That.
]]>The post 5 Bed Exercises That Restore Hip Strength Faster Than Stretching After 60 appeared first on Eat This Not That.
]]>“As we get older, we lose muscle mass, our muscles don’t fire as efficiently and all-important glutes, hip flexors and deep stabilizers of the hip don’t work as well as they used to,” explains Suzana De Pina, Clinical Exercise Physiologist at Papayya. “Their gait may be slower, strides shorter, and balance more precarious, raising the risk they will accidentally topple over. But few of us specifically target our hips and legs for strengthening, which means they commonly weaken with age, even as hip power remains vital for our balance and well-being.”
Bed exercises accomplish so much more than simply stretching out your body. The support of the bed helps to engage your muscles and build strength without navigating balance challenges and impact on the joints.
“They are all gentle, but effective, and a good entry point for many older adults,” De Pina tells us.
Below are five bed exercises to add to your routine to restore hip strength.
Trunk Rotations
“This exercise stretches out your back,” De Pina notes. “It’s an incredibly intense strategy that is fundamental to the therapy regime, involving hip and trunk/core control.”
- Begin by lying flat on your back.
- Bend your knees and keep your feet flat.
- Move both of your knees to one side, then the other.
- Perform 10 reps on each side.
RELATED: 4 Bed Exercises That Restore Thigh Strength Faster Than Squats After 65
Modified Bridges
“This move strengthens your glutes and your adductors, a muscle group responsible for stabilizing you when you walk,” De Pina explains.
- Begin by planting both feet flat on the mattress.
- Lie flat on your back and press your hips 2 inches off the bed.
- Slowly lower.
- Complete 2 sets of 8 to 10 reps.
RELATED: 6 Morning Moves That Keep You Stronger Than Most 30-Year-Olds After 55
Hip Bends

“This exercise effectively increases hip mobility, while also activating your muscles,” De Pina tells us.
- Begin by lying flat on your back.
- Pull one knee up toward your chest to stretch out your lower back.
- Slowly lower your leg to avoid joint strain.
- Stop with your hands on the mattress.
- Repeat 5 to 10 times on both the left and right sides.
RELATED: If You Can Master These 3 Bodyweight Movements After 60, You’re Stronger Than Most
Figure 4 Stretch
“This dynamic exercise is great for opening up the hips and easing stiffness,” De Pina notes.
- Begin lying flat on your back.
- Cross one ankle over the opposite thigh so that your knee is pushed away from you.
- Complete 5 to 10 reps on each side.
RELATED: 5 Standing Strength Moves That Reverse Muscle Loss Faster Than the Gym After 45
Hip Flexor Stretch
- Begin by sitting near the edge of the bed.
- Hug one of your knees in toward your chest and allow the other leg to dangle off the side of the bed.
- Repeat 5 times on each side.
The post 5 Bed Exercises That Restore Hip Strength Faster Than Stretching After 60 appeared first on Eat This Not That.
]]>The post The 10-Minute Morning Routine That Smooths Back Rolls Faster Than Gym Machines After 55 appeared first on Eat This Not That.
]]>Why Back Rolls Get Stubborn After 55
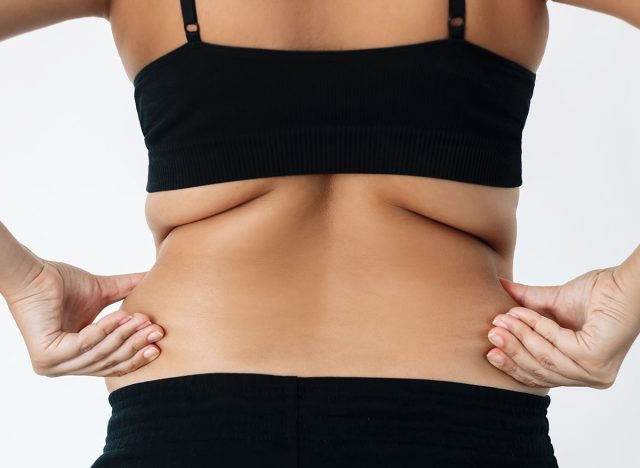
Back rolls aren’t just about gaining weight — although that can play a part. Three things happen at the same time that make this area particularly difficult.
The muscles in your upper back, including your rhomboids, middle trapezius and posterior deltoids, weaken with age. When this happens, your shoulders hunch forward and your upper back becomes increasingly curved. This results in skin and any fat in the region folding and bulging over into a roll.
You also lose between 3–8% of muscle mass each decade after 30, accelerating after 50. As you lose mass in your back, the muscles become less firm and sculpted. The fat doesn’t necessarily increase — but with less muscle beneath the skin, the same amount of fat appears more prominent.
Women, especially during and after menopause, experience a decrease in oestrogen levels that shifts fat distribution from the hips and thighs toward the abdomen and upper back. Men experience similar effects from declining testosterone. Both men and women become more likely to store fat around the midsection and upper body rather than the lower body.
The stubbornness comes from the fact that your back isn’t an area you naturally use much in daily life anymore. When you sit at a desk, drive a car, or scroll through your phone, you’re reinforcing that rounded-forward position for hours each day. Your back muscles get weaker, your posture gets worse, and the problem compounds itself.
You can’t spot-reduce fat from any single area — anyone who tells you otherwise is wrong. But you can absolutely rebuild the muscle, fix your posture, and create a smoother, stronger back.
RELATED: 4 Morning Exercises That Restore Thigh Muscle Faster Than Lunges After 55
Why Morning Training Works Better

I’ve been training at 6 am for over 25 years. Morning training isn’t magic — but it does have some real advantages, especially for people over 55.
Morning cortisol levels are naturally higher. Cortisol is often demonised as the “stress hormone,” but at optimal levels it aids fat loss, improves energy, and mobilises fat from storage. Training in the morning works in concert with your own body.
There’s also fasted or semi-fasted training to consider — and you don’t have to skip breakfast for this to apply. It simply means your body has had 8–10 hours without food. Fasted training has been shown to increase fat oxidation during exercise. You don’t burn more calories, but you train your body to use fat stores more efficiently.
The biggest advantage, though? Consistency. If you leave exercise until later in the day, life gets in the way. Work runs late, you’re tired, someone needs your help, or you simply can’t be bothered after a long day. When you train first thing, it’s done before your day even starts.
I’ve watched thousands of clients try both approaches. The ones who train in the morning stick with it. The ones who plan to train “later” usually don’t. Consistency beats perfection every single time.
That said, if mornings genuinely don’t work for you, training at any time is better than not training at all. The best time to exercise is whenever you’ll actually do it regularly.
Why Skip the Gym Machines
Machines aren’t useless, but they’re not the best tool for this job. Back rolls develop partly because of weak postural muscles, and these muscles need to work together to hold your body in the right position.
Gym machines isolate single muscle groups and lock you into fixed movement patterns. A lat pulldown machine works your lats, but it doesn’t teach your shoulder blades to move properly or your upper back to hold good posture.
Bodyweight exercises force your muscles to work as a system. When you do a wall angel or a prone Y raise, every stabilising muscle in your upper back has to fire. Your body learns to move the way it should in real life. You’re not just building strength in isolation — you’re teaching your nervous system to use that strength functionally.
Machines also require a gym. That means travel time, membership fees, and the effort of actually getting there. A 10-minute routine at home removes every single barrier. You can do it in your pyjamas if you want.
The one limitation of bodyweight work is progressive overload. Eventually you’ll need to make exercises harder to keep seeing results. With machines, you just add weight. With bodyweight, you need to change the angle, slow the tempo, or add variations. It’s doable — but it requires more thought.
RELATED: 4 Standing Exercises That Shrink Apron Belly Faster Than Weight Training After 50
Wall Angels
This opens up your chest, strengthens your upper back, and teaches your shoulder blades to move properly. Most people over 55 have shoulders that roll forward from years of sitting. Wall angels reverse that pattern.
Muscles Trained: Rhomboids, middle trapezius, posterior deltoids, rotator cuff
How to Do It:
- Stand with your back against a wall, feet about 10cm away from the base
- Press your lower back, upper back, and head against the wall
- Raise your arms into a “goal post” position with elbows bent at 90 degrees, backs of your hands against the wall if possible
- Slowly slide your arms up the wall, keeping contact the whole time
- Go as high as you can without your lower back losing contact with the wall or your ribs arching away
- Slide back down to the starting position — that’s one rep
Avoid These Mistakes:
- Don’t arch your lower back to get your arms higher — keep your ribs down and core engaged
- Don’t rush; take 3 seconds up, 3 seconds down
- Don’t worry if your hands can’t stay flat on the wall — go as close as you can
Modifications: If you can’t get your arms into the starting position without pain, place your hands at shoulder height and just focus on sliding them a few inches. If your lower back won’t stay flat, move your feet further from the wall. If shoulder issues make this painful, skip it and add an extra set of Prone Y Raises instead.
Recommended Sets and Reps: 2 sets of 10 reps.
Prone Y Raises
This targets the exact muscles that smooth out your upper back — the middle and lower trapezius. These are the muscles that pull your shoulder blades down and together, creating that toned look.
Muscles Trained: Middle trapezius, lower trapezius, rear deltoids
How to Do It:
- Lie face down on the floor or on your bed
- Extend your arms straight out in a Y position, hands wider than your head
- Turn your thumbs up toward the ceiling
- Squeeze your shoulder blades together and lift your arms off the ground, keeping them straight
- Hold for 2 seconds at the top
- Lower back down with control — that’s one rep
Avoid These Mistakes:
- Don’t lift your head and shoulders too high — 5–10cm off the ground is enough
- Keep your head neutral, looking at the floor
- Don’t bend your elbows to make it easier — keep your arms straight; if it’s too hard, narrow the Y by bringing your arms closer to your body
Modifications: If lying on the floor hurts your neck or hips, lie across your bed with your upper body hanging off the edge. If you can’t lift your arms at all, just squeeze your shoulder blades together without lifting. If that causes shoulder pain, place your hands by your sides instead of in a Y position.
Recommended Sets and Reps: 2 sets of 12 reps.
RELATED: If You Can Do This Many Pushups After 50, Your Arm Strength Is Elite
Cat-Cow Stretch
This mobilises your entire spine, improves flexibility in your upper back, and helps reduce the appearance of rolls by creating better spinal movement. Stiffness in your thoracic spine makes back fat look worse — this directly addresses that.
Muscles Trained: Erector spinae, multifidus, thoracic extensors
How to Do It:
- Start on your hands and knees — hands under shoulders, knees under hips
- Arch your back, dropping your belly toward the floor and lifting your head and tailbone up (cow position)
- Hold for 2 seconds
- Round your back, tucking your chin to your chest and pulling your belly button toward your spine (cat position)
- Hold for 2 seconds — that’s one round
Avoid These Mistakes:
- Don’t move too fast — take your time with each position
- Don’t limit your range of motion; really arch and really round — make it exaggerated
- Don’t shrug your shoulders up toward your ears; keep your shoulder blades down
Modifications: If your wrists hurt, make fists and put your knuckles on the ground instead of flat palms. If your knees hurt, place a folded towel under them. If you can’t get on the floor, do this standing with your hands on a kitchen counter — same spinal movement, just vertical instead of horizontal.
Recommended Sets and Reps: 10 slow rounds.
Reverse Snow Angels
This strengthens the muscles between your shoulder blades while also working your rear deltoids. It’s one of the best exercises for pulling your shoulders back and smoothing out upper back fat.
Muscles Trained: Rhomboids, middle trapezius, rear deltoids
How to Do It:
- Lie face down on the floor, arms by your sides, palms facing down
- Lift your arms slightly off the ground — just a few centimetres
- Keeping them straight and hovering, sweep them out to the sides and up toward your head in a snow angel motion
- When your arms are overhead, pause for 2 seconds
- Sweep them back down to your sides — that’s one rep
- Your arms stay off the ground the entire time
Avoid These Mistakes:
- Don’t touch the ground between reps — the constant hover is what makes this work
- Don’t lift your arms too high at the start, then struggle to maintain it; start small
- Don’t hold your breath — breathe normally throughout
Modifications: If you can’t keep your arms off the ground for the full movement, break it into two parts: sweep out to the sides and lower, rest, then sweep overhead and lower. If shoulder pain is an issue, reduce the range of motion and only sweep halfway up. If lying flat doesn’t work, do this standing facing a wall with your arms moving up and down the surface.
Recommended Sets and Reps: 2 sets of 10 reps.
RELATED: 5 Morning Exercises That Firm Upper Arm Flab Faster Than Lifting Weights After 60
Thread the Needle
This adds rotation to your thoracic spine and stretches the muscles along your upper back. Rotation helps smooth everything out and improves how you move in daily life.
Muscles Trained: Thoracic rotators, rhomboids, rear deltoids
How to Do It:
- Start on your hands and knees
- Take your right hand and reach it under your left arm, threading it through the gap
- Your right shoulder and head will lower toward the ground as you rotate through your spine
- Go as far as is comfortable
- Hold for 5 seconds, then return to the starting position — that’s one rep
- Complete 5 reps on the right side, then switch to the left
Avoid These Mistakes:
- Don’t just reach with your arm — the movement should come from your mid-back twisting; really emphasise the rotation
- Don’t force this stretch; if you feel pinching or sharp pain, back off — it should feel like a comfortable stretch
Modifications: If this bothers your wrists or knees, do it standing. Place your left hand on a wall at shoulder height, then thread your right arm under your left arm and reach toward the wall behind you, rotating through your spine. If rotation causes back pain, skip this entirely and add an extra set of Wall Angels instead.
Recommended Sets and Reps: 5 reps per side.
Superman Holds
This strengthens your entire posterior chain — lower back, glutes, upper back, and shoulders. It’s the finishing move that ties everything together and builds endurance in all the muscles that keep your posture strong.
Muscles Trained: Erector spinae, glutes, lower trapezius, rear deltoids
How to Do It:
- Lie face down on the floor, arms extended straight overhead
- Simultaneously lift your arms, chest, and legs off the ground
- Hold this position for 10 seconds — you should look like Superman flying
- Lower everything back down and rest for 10 seconds — that’s one set
Avoid These Mistakes:
- Don’t lift too high and compress your lower back — a small lift with a strong squeeze is all you need
- Don’t hold your breath
- Don’t jerk up into position — lift smoothly and with control
Modifications: If the full Superman bothers your lower back, lift just your upper body and keep your legs on the ground. If even that’s uncomfortable, just lift your arms. If lifting overhead causes shoulder pain, place your hands behind your lower back and lift only your chest. The movement matters more than the arm position.
Recommended Sets and Reps: 3 sets of 10-second holds.
RELATED: 5 Exercises Men Over 55 Should Do Daily to Restore Leg Strength
How to Progress When It Gets Easy

The first progression is adding time under tension. Instead of holding positions for 2 seconds, hold for 5. Slow down each wall angel so the rep takes 8–10 seconds. This makes your muscles work harder without changing anything else.
The second progression is adding reps. If you’re doing 2 sets of 10, move to 2 sets of 15, then 2 sets of 20. Your muscles adapt to volume, so more reps create more stimulus.
The third progression is changing angles. For prone Y raises, lie on an incline with your upper body elevated on pillows or the edge of your bed. For wall angels, move your feet closer to the wall — harder to maintain proper position.
Adding light resistance comes next. Hold a small tin of beans in each hand for prone Y raises or reverse snow angels. Even 400g makes a difference. You don’t need dumbbells.
The final progression is more challenging variations. Wall angels become standing Y raises with bands. Prone Y raises become bent-over Y raises. Thread the needle becomes thoracic rotations with a resistance band.
Only progress when the current routine feels genuinely easy for at least a week. If you’re still feeling muscle fatigue or your form breaks down toward the end of any exercise, stay where you are.
Most people over 55 should focus on time under tension and reps before adding any resistance. Building endurance in these postural muscles matters more than maximal strength.
What to Expect in 4 to 8 Weeks

In the first two weeks, you won’t see visual changes yet — but you’ll feel different. Your upper back will feel less tight. You’ll notice you’re not slouching as much when you sit. Getting out of bed or out of a chair will feel easier because your posture is already starting to improve.
At four weeks, the first visible changes arrive. The area around your shoulder blades will look more defined. Your upper back will sit flatter when you stand sideways to a mirror. The rolls won’t be gone, but they’ll be noticeably smoother. Your shoulders will look broader because they’re no longer rounding forward.
At eight weeks, other people will start commenting. Your posture will be obviously better. Your clothes will fit differently across your upper back and shoulders. The combination of stronger muscles, improved posture, and the slight fat loss that comes from consistent movement will create real visible change.
RELATED: The 7-Minute Chair Routine That Firms Belly Pooch Faster Than Crunches After 60
Daily Habits That Speed Up Results

The habits that accelerate results are straightforward. First, nutrition matters. You can’t out-exercise a poor diet. Focus on protein — aim for roughly 1.2–1.6g per kilogram of body weight daily — eat plenty of vegetables, and don’t go overboard on processed foods. You don’t need a perfect diet, just a reasonable one.
Second, your daily movement outside this routine matters. Take walks. Move regularly throughout your day. Every hour you spend sitting in a rounded position works against what you’re building in your morning routine.
Third, sleep matters more than most people realise. When you sleep, your muscles recover and adapt. Aim for 7–8 hours. If you’re only getting 5–6, your results will be slower.
Fourth, your water intake affects how your skin looks. Dehydrated skin emphasises every lump and roll. Drink roughly 2 litres a day, more if you’re active or it’s hot.
Fifth, stress levels affect cortisol, which affects where your body stores fat. Chronic stress makes everything harder. Find ways to manage it — walking, reading, whatever works for you.
None of these habits needs to be perfect. Small improvements across all of them add up faster than perfection in one area.
When to Check With Your Doctor First

For the vast majority of healthy people over 55, this routine is safe. It’s low-impact, bodyweight-based, and designed specifically for this age group. But there are a few situations where it’s worth checking with your GP before starting.
Talk to your doctor or physio first if you have any existing shoulder injuries or conditions — rotator cuff tears, frozen shoulder, or shoulder impingement. These exercises shouldn’t make those problems worse, but it’s better to confirm.
Get clearance first if you have diagnosed osteoporosis or severe osteopenia, especially in your spine. The spinal extension and flexion movements here are generally safe, but your doctor might want to suggest modifications.
Don’t start without medical advice if you have spinal stenosis, herniated discs, or chronic back pain that radiates down your legs. Some of these movements involve spinal extension, which can aggravate certain conditions.
If you’ve had recent surgery — within the last six months — on your shoulders, spine, or anywhere in your upper body, wait until your surgeon or physio clears you for exercise.
If you have uncontrolled high blood pressure or cardiovascular issues, check with your doctor. These exercises aren’t high-intensity, but any new exercise programme is worth discussing if you have heart-related conditions.
And if you experience sharp pain, dizziness, chest pain, or severe breathlessness during any of these exercises, stop immediately and see your doctor. Mild muscle fatigue is normal. Pain is not.
The post The 10-Minute Morning Routine That Smooths Back Rolls Faster Than Gym Machines After 55 appeared first on Eat This Not That.
]]>The post 5 Morning Exercises That Firm Upper Arm Flab Faster Than Lifting Weights After 60 appeared first on Eat This Not That.
]]>Working on firming this area of the body and building arm strength is essential at this age, because you lose roughly 3% to 8% of lean muscle every decade after 30. Strong arms help lower your risk of injury, boost joint stability and posture, increase metabolism, and most importantly, help you perform daily activities with ease. Think about everything you need arm strength for each day—carrying groceries, lifting grandchildren or pets, and even emptying the garbage. That’s where these morning moves come into play.
“After 60, your body starts playing by a different set of rules. We’re dealing with sarcopenia, which is just a fancy way of saying your body is trying to shed muscle mass like it’s out of style. Combine that with a natural drop in collagen and skin elasticity, and you get what people call ‘bat wings.’ It’s not just about fat; it’s about the fact that the ‘sleeve’ (your skin) has lost its shape and the ‘arm’ (your muscle) has shrunk. If you aren’t actively giving your body a reason to keep that muscle, it’ll let it go,” explains Joe Ghafari, Certified Personal Trainer, Certified Nutritionist, and the Co-Founder and Head Coach of Visiting Wrld, a premium LGBTQ+ fitness retreat brand that blends world travel, structured fitness coaching, nutrition education, and community connection.
Traditional weight lifting certainly has its place, but it can feel restrictive or challenging on the joints for many individuals over 60.
“Functional bodyweight moves are superior because they require stability. When you lift a dumbbell, the weight is isolated,” Ghafari tells us. “When you move your own body, you’re engaging the stabilizer muscles in your shoulders and core. You’re teaching your body to move as one unit. Plus, you can do these the second you get out of bed. Consistency is the only thing that moves the needle, and bodyweight moves eliminate every excuse.”
Wall Pushups
- Stand tall, arms-length away from a wall.
- Place your hands shoulder-width apart on the surface.
- Engage your core and bend your elbows to lower your chest toward the wall. Keep your elbows tucked at a 45-degree angle, not flared out.
- Press back up to the starting position, keeping the movement slow and controlled.
- Perform 3 sets of 15 reps.
RELATED: 5 Arm-Firming Exercises That Smooth Bat Wings in 30 Days After 50
Seated Tricep Dips
- Begin sitting at the edge of a sturdy chair.
- Place your hands on the edge of the seat and lift your tailbone off the chair.
- Walk your feet away until your knees, hips, and torso form 90-degree angles.
- Activate your core and keep your shoulders relaxed as you bend your elbows and lower your body just below the seat.
- Press back up until your arms are straight, engaging your triceps as you do so.
- Perform 3 sets of 12 reps.
RELATED: 7 Moves to Build Strong Arms in 30 Days After 45
Arm Circles
- Begin standing tall with your feet hip-width apart.
- Extend both arms at shoulder level.
- Make tiny, controlled circles with your arms, slowly increasing the size.
- Make forward circles, then reverse the direction.
- Perform 2 sets of 60 seconds.
RELATED: 4 Moves That Build Arms Faster Than Bicep Curls After 40, According to US Army Coach
Shadow Boxing
- Start by assuming a shallow squat or athletic stance.
- Punch forward with alternating arms in a continuous motion.
- Keep your core braced and the tempo high.
- Do shadow boxing for 3 sets of 1 minute.
RELATED: 5 Standing Exercises To Shrink Your ‘Armpit Pooch’ For Good
Inverted Wall Planks
- Begin by leaning your back against the wall.
- Walk your feet out.
- Push your body away from the wall using just your palms.
- Perform 3 sets of 10 reps.
The post 5 Morning Exercises That Firm Upper Arm Flab Faster Than Lifting Weights After 60 appeared first on Eat This Not That.
]]>The post The 6-Minute Chair Routine That Restores Hip Strength Faster Than Floor Stretches After 60 appeared first on Eat This Not That.
]]>“After 60, a combination of normal age-related muscle loss and a statistically likely more sedentary lifestyle can mean the muscles around the hips are not challenged in the ways needed for maintaining strength, balance, and conditioning,” explains John White, Level 3 Sports Massage Therapist, running expert, and qualified adult nurse. “As a result, weakened muscles can feel tighter and harder to control when standing from a sitting position. Traditional floor stretches gently ease tension held within these tight muscles, giving fast but temporary relief, but for some, getting down to the floor (and back up again!) may not only be hard work but also potentially cause injury. Chair / seated exercises are effective and can be a safer option for many—especially after 60.”
The 6-Minute Chair Routine That Restores Hip Strength

To obtain long-term benefits, it’s essential not only to stretch, but also to strengthen your hip muscles. This, in turn, improves flexibility and comfort.
Perform each exercise for at least 90 seconds per day.
“Making this routine a regular habit will show benefits quickly. You’ll want to combine it with other gentle exercises for overall health, and the occasional massage for muscle relief and stimulation is a great way to reduce any tension, and reward your effort,” says White.
Seated Hip Abduction
- Begin by sitting tall.
- Place a resistance band just above your knees. Alternatively, place your hands on your outer thighs, pressing inward to create resistance.
- Push your thighs out.
- Hold for 2 seconds.
- Slowly return to the start position.
- Perform 3 sets of 12 reps.
RELATED: Why Everyone Over 45 Is Secretly Using ‘Peptide Stacking’ to Rebuild Lost Muscle
Seated External Rotation
- Begin sitting tall.
- One leg at a time, rotate your knee inward with your toes slightly lifted.
- Hold for 2 seconds at the widest point.
- Gradually return to the start position.
- Complete 2 sets of 10 reps per side.
RELATED: 4 Wall Exercises That Reverse Muscle Loss Faster Than Protein Shakes After 45
Seated Heel Press-Back Glute Squeeze
- Begin sitting tall at the edge of your chair.
- Press one heel back and into the ground at an angle while squeezing your bottom glute cheek.
- Hold the squeeze for 3 seconds.
- Release and relax your heel.
- Perform 2 sets of 10 reps on each side.
RELATED: 5 Short Workouts That Keep You Stronger Than Most 30-Year-Olds After 50
Slow Sit-to-Stand
- Begin sitting tall.
- Count slowly to 3 as you stand up tall, pausing halfway for a couple seconds.
- Take 3 counts as you return back to a seated position.
- Perform 3 sets of 5 reps.
The post The 6-Minute Chair Routine That Restores Hip Strength Faster Than Floor Stretches After 60 appeared first on Eat This Not That.
]]>