The post 5 Daily Exercises That Flatten Belly Overhang Faster Than Crunches After 60 appeared first on Eat This Not That.
]]>“A ‘belly overhang‘ after 60 is typically the result of several overlapping factors—not just excess fat,” Canham tells us. First, sarcopenia reduces muscle tone in the core and lower body. As deep stabilizing muscles weaken, the abdomen has less structural support and can protrude. Second, hormonal changes—including lower estrogen and testosterone—shift fat storage toward the lower abdomen. Third, skin elasticity declines with age due to reduced collagen, which can contribute to a softer, more pronounced overhang.”
And finally, changes in posture—such as an anterior pelvic tilt—and sedentary habits can worsen the appearance of a protruding belly, even in those who are active.
“Addressing it requires improving muscle support, posture, and overall body composition, not just increasing activity,” Canham says. “Crunches target the rectus abdominis, but they don’t address the deeper core muscles that support the abdomen. They also don’t reduce fat in a specific area—fat loss occurs systemically, not locally.”
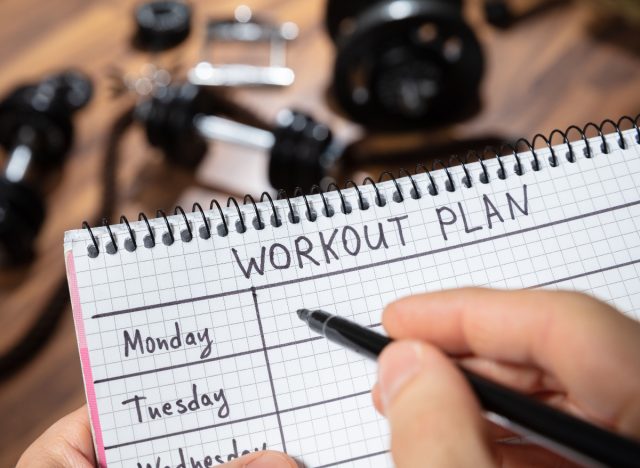
Below, Canham breaks down five daily exercises to prioritize in your workouts. They emphasized deep core strengthening, full-body muscle engagement, and pelvic alignment—all of which are crucial for improving the appearance and function of the abdominal region after 60.
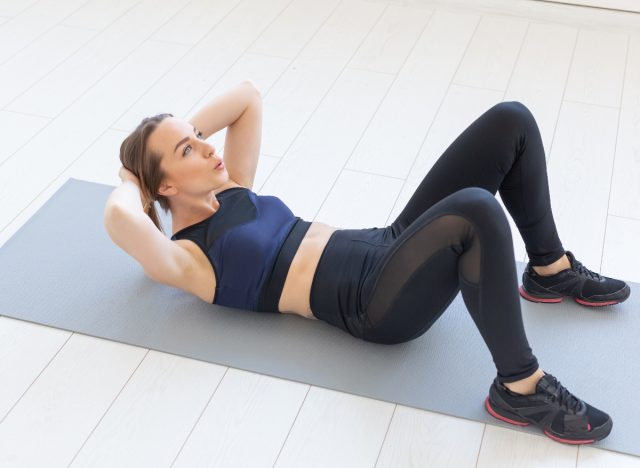
Supine Deep Core Breathing
- Lie flat on your back with knees bent and feet flat on the mattress.
- Place one hand on your chest and the other on your belly.
- Take a deep breath in through the nose, allowing your lower hand to naturally rise as your belly expands.
- Slowly exhale through the mouth.
- Perform 2 sets of 8 to 10 gradual breaths.
RELATED: 5 Standing Core Moves That Flatten Your Stomach After 40
Glute Bridges
- Lie flat on your back with bent knees and feet hip-width apart, arms at your sides with palms pressing into the mattress.
- Press through your heels to lift your hips until your body forms a straight line from head to heels.
- Squeeze your buttocks, holding at the top for 2 seconds.
- Lower your hips back to the start position.
- Perform 2 to 3 sets of 10 to 12 reps.
RELATED: 5 Chair Exercises That Flatten Belly Overhang Faster Than Planks After 50
Dead Bugs
- Lie face-up on the mattress with your arms extended toward the sky and knees lifted and bent to 90 degrees.
- Press your lower back into the mattress as you gradually lower your left arm and extend your right leg.
- Return to the center.
- Then, lower your right arm and left leg.
- Continue to alternate.
- Perform 2 to 3 sets of 8 to 10 reps on each side.
Bird-Dog
- Start on all fours.
- Extend your left arm and right leg, keeping your core braced.
- Hold for 2 to 3 seconds before returning to the start position.
- Switch sides, continuing to alternate.
- Perform 2 sets of 8 reps on each side.
RELATED: These 4 Lower-Body Moves Burn Belly Fat Without Touching Your Core
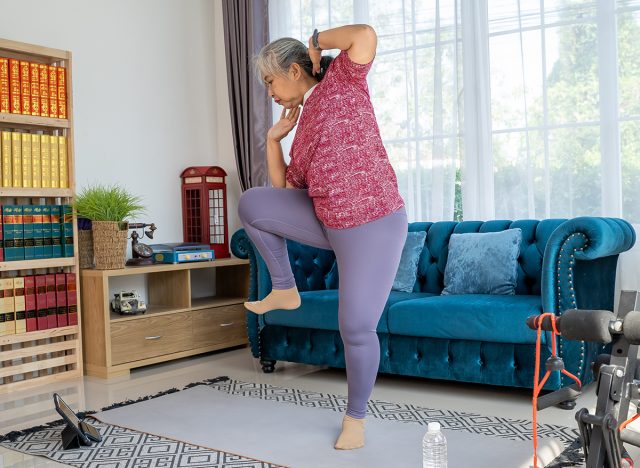
Standing March
- Start by standing tall with your feet hip-width apart and arms at your sides.
- Lift your left knee up to hip height, pausing for a moment at the top and keeping your core engaged.
- Lower your foot and repeat with your right knee, holding it at the top for a moment before lowering.
- Maintain solid posture and steady breathing throughout.
- Perform 2 to 3 sets of 20 alternating steps.
The post 5 Daily Exercises That Flatten Belly Overhang Faster Than Crunches After 60 appeared first on Eat This Not That.
]]>The post 5 Bed Exercises That Flatten Stubborn Midsection Faster Than Crunches After 60 appeared first on Eat This Not That.
]]>There are several ways to strengthen this area, including crunches. This exercise isolates the abdominal muscles and can be a solid addition to a well-rounded ab workout. But we spoke with Karen Ann Canham, CEO and founder of Karen Ann Wellness, Board-Certified Wellness Coach, and Nervous System Specialist who has almost two decades of experience in wellness and corporate leadership, to learn a much better approach. Canham shares five bed exercises that can help flatten the stubborn midsection faster than crunches after 60.
Why Crunches Aren’t an Effective Go-to Solution for Burning Belly Fat
If you’re looking to melt pesky belly fat, crunches aren’t the most effective choice.
“Crunches don’t directly burn belly fat—and this becomes even more relevant after 60,” Canham stresses. “First, spot reduction isn’t physiologically effective. Fat loss happens systemically, not from the specific area being exercised. Crunches primarily strengthen the rectus abdominis, but they don’t significantly impact abdominal fat stores.”
In addition, after you hit 60, sarcopenia causes a reduction in lean muscle mass and slower metabolic rate. This makes it much easier to store fat and more difficult to get rid of it—especially in the abdominal region.
“Hormonal changes—including lower estrogen or testosterone and higher cortisol—shift fat storage toward the abdomen,” Canham adds. “Finally, crunches can increase intra-abdominal pressure without strengthening the deeper stabilizing muscles (like the transverse abdominis), which can actually make the abdomen appear more protruded if those muscles are weak.”
Flattening your belly calls for improved muscle tone, metabolism, and posture—not performing countless crunches. Below, Canham shares five bed exercises to add to your routine.
“These exercises focus on deep core activation, pelvic stability, and full-body muscle engagement, which are more effective for improving how the midsection looks and functions than high-rep crunches alone,” Canham says.
Supine Deep Core Breathing
- Lie flat on your back with knees bent and feet flat on the mattress.
- Place one hand on your chest and the other on your belly.
- Take a deep breath in through the nose, allowing your lower hand to naturally rise as your belly expands.
- Slowly exhale through the mouth.
- Perform 2 sets of 8 to 10 slow breaths.
RELATED: This 20-Minute Bodyweight Workout Melts Hanging Belly Fat Better Than Crunches After 40
Dead Bugs
- Lie face-up on the mattress with your arms extended toward the sky and knees lifted and bent to 90 degrees.
- Press your lower back into the mattress as you gradually lower your left arm and extend your right leg.
- Return to the center.
- Then, lower your right arm and left leg.
- Continue to alternate.
- Perform 2 to 3 sets of 8 to 10 reps on each side.
RELATED: 5 Standing Moves That Shrink Belly Fat Without Getting on the Floor
Glute Bridges
- Lie flat on your back with bent knees and feet hip-width apart, arms at your sides with palms pressing into the mattress.
- Press through your heels to lift your hips until your body forms a straight line from head to heels.
- Squeeze your buttocks, holding at the top for 2 seconds.
- Lower your hips back to the start position.
- Perform 2 to 3 sets of 10 to 12 reps.
RELATED: 5 Daily Moves That Flatten Belly Fat Better Than Dieting After 40
Lying Alternating Toe Taps
- Lie flat on your back with knees bent to 90 degrees and hips stacked over your heels.
- Keep your arms at your sides for support.
- Activate your core and press your lower back into the mattress.
- Gently lower your left foot toward the mattress, tapping your toes to the surface.
- Return to the tabletop position.
- Repeat on the other side.
- Perform 2 to 3 sets of 10 to 12 reps on each side.
RELATED: Denise Austin’s 5 Habits to Tackle Stubborn Belly Fat
Side-Lying Leg Lifts
- Begin by lying on one side with your legs stacked, your head resting on your bottom arm, and your top hand placed on your hip.
- Lift your top leg upward.
- Hold it for a moment.
- Slowly lower.
- Repeat on the other side.
- Perform 2 sets of 10 to 12 reps on each side.
The post 5 Bed Exercises That Flatten Stubborn Midsection Faster Than Crunches After 60 appeared first on Eat This Not That.
]]>The post 5 Bed Exercises That Flatten Apron Belly Faster Than Pilates After 60 appeared first on Eat This Not That.
]]>Bed exercises create the perfect environment for that kind of training. They reduce strain on the joints while allowing you to focus entirely on muscle engagement and breathing. I’ve had many clients stick with these routines simply because they feel comfortable and easy to start, which leads to better consistency, and better results.
Another major advantage comes from control. On a stable surface, you can slow everything down and keep the abdominal muscles under tension longer. That extended time under tension plays a huge role in rebuilding strength and firmness through the lower midsection. When done correctly, these exercises challenge the core far more than they appear to.
The following movements focus on the lower abs, deep core stabilizers, and supporting muscles that help flatten the belly. Move slowly, breathe steadily, and concentrate on tightening your midsection during every repetition. With consistent practice, these exercises help restore the strength that naturally holds the abdomen in.
RELATED: 5 Bed Exercises That Restore Back Strength Faster Than Physical Therapy After 60
Lying Knee Tucks
Knee tucks directly target the lower abdominal muscles, which play a major role in controlling belly overhang. I often start clients here because the movement teaches proper core engagement without placing pressure on the back or shoulders. Drawing the knees toward the chest forces the abdominal wall to contract in a controlled and deliberate way.
As the legs extend again, the core must stay engaged to prevent the lower back from lifting. That constant tension builds strength and improves control over time. Many clients notice this movement quickly reveals how much work the lower abs actually need.
How to Do It
- Lie flat with legs extended
- Pull both knees toward your chest
- Tighten your abdominal muscles
- Extend legs slowly
- Repeat with control.
Heel Slides With Core Brace
Heel slides strengthen the deep stabilizing muscles of the core while keeping the movement extremely controlled. I use this exercise often because it teaches the body how to maintain abdominal tension while the legs move.
Sliding one leg away from the body forces the core to stay tight and prevent the lower back from arching. This type of control directly improves how the abdominal muscles support the stomach during everyday movement.
How to Do It
- Lie on your back with knees bent
- Tighten your core muscles
- Slide one heel away slowly
- Pause briefly
- Return and switch legs.
RELATED: The 6-Minute Chair Routine That Builds Leg Muscle Faster Than Squats After 60
Lying Leg Raises With Hold
This movement strengthens the lower portion of the abdominal wall through controlled lifting and holding. I often include a brief pause because it increases time under tension, which helps build strength more effectively.
Lifting the legs forces the abdominal muscles to stabilize the pelvis, while the hold challenges endurance. Over time, this combination helps tighten the area most responsible for belly overhang.
How to Do It
- Lie flat with legs extended
- Lift both legs slightly off the bed
- Hold for 2–3 seconds
- Lower slowly
- Repeat steadily.
Alternating Bed March
The alternating march builds coordination between the core and hips while maintaining constant abdominal engagement. I use this movement frequently because it mimics natural leg motion while forcing the core to stabilize.
Each time a knee lifts, the abdominal muscles must engage to keep the torso steady. This repeated activation strengthens the deep core muscles that support the stomach throughout the day.
How to Do It
- Lie on your back with knees bent
- Lift one knee toward your chest
- Keep your core tight
- Lower slowly
- Alternate legs continuously.
RELATED: If You Can Hold a Squat This Long After 60, Your Lower-Body Strength Is Top-Tier
Toe Reach Crunch
The toe reach crunch strengthens the upper and mid-abdominal muscles while keeping the movement controlled and supported. I like using this exercise because it engages the entire abdominal wall without requiring a full sit-up.
Reaching toward the toes creates a strong contraction through the core. When performed slowly, the muscles stay under tension longer, which helps improve firmness across the stomach.
How to Do It
- Lie on your back with legs raised
- Reach both hands toward your toes
- Tighten your abdominal muscles
- Lower slowly
- Repeat with control.
The post 5 Bed Exercises That Flatten Apron Belly Faster Than Pilates After 60 appeared first on Eat This Not That.
]]>The post 5 Standing Exercises That Shrink Stubborn Waist Thickening Faster Than Cardio After 60 appeared first on Eat This Not That.
]]>I’m a personal trainer and fitness educator at TRAINFITNESS, and I’ve been working in the fitness industry for 40 years. One of the most common concerns I hear from clients over 60 is their waist thickening and expanding, even when they’re walking regularly or doing other forms of cardio. Although frustrating, this isn’t something you have to accept as inevitable, and there are specific standing exercises that can make a real difference.
These five exercises can be done in your living room with no equipment, take 15 to 20 minutes, and target the specific muscles that shrink and define your waist over time.
RELATED: The 8-Minute Daily Routine That Builds More Core Strength Than Planks After 65
Why Cardio Alone Won’t Cut It

After 60, our bodies go through hormonal shifts that change where we store fat. For women, dropping oestrogen levels mean more fat accumulates around the midsection rather than the hips and thighs. Men experience similar changes as testosterone declines. This isn’t just about gaining weight; it’s about fat redistributing itself to places it didn’t accumulate before.
Starting from age 30, we lose an average of 3 to 8% of muscle mass per decade, and that loss accelerates after 60. Muscle is essential for metabolism. The less we have, the slower our resting metabolic rate. Even if you’re eating the same as you were a decade ago, your body is likely storing more of it as fat.
Cardio doesn’t address this for two reasons. First, although it burns calories during the activity, it doesn’t preserve or build muscle. You might walk an hour a day and burn calories while you’re moving, but once you stop, your metabolism returns to its baseline. Walking is brilliant for your heart, but it won’t do much to shift your body composition.
Second, there’s the type of fat to consider. Visceral fat, which accumulates around organs and pushes your stomach out, is particularly hard to shift. Research shows resistance exercise is more effective at tackling this type of fat compared to cardio alone.
Why Standing Exercises Work
Standing exercises build muscle, and muscle is metabolically energetic tissue. Every bit of muscle you add or maintain increases the number of calories your body burns throughout the day, not just during exercise. This creates a compounding effect over weeks and months that cardio simply can’t match.
When you perform standing exercises that engage your core and work multiple muscle groups, your body has to stabilise itself constantly. Your abdominals, obliques, and deep core muscles all fire to keep you upright and balanced. This strengthens and tones the muscles around your waist in a way that walking never will.
There’s also the afterburn effect. Resistance training creates micro-tears in muscle fibres that your body then has to repair. That repair process burns calories for 24 to 48 hours after you finish exercising. Cardio doesn’t create the same level of metabolic demand once you’ve stopped moving.
Standing exercises are also practical and sustainable for older adults. You don’t need to get down on the floor and back up again repeatedly. You’re not putting stress on joints through high-impact movements. You can do these in your living room with minimal or no equipment, which means you’re more likely to stick with them long-term.
RELATED: If You Can Hold a Plank This Long After 60, Your Core Strength Is Stronger Than 90% of Peers
Standing Torso Rotation
This exercise directly works your obliques, the muscles on the sides of your waist that create definition and control rotation. When these muscles strengthen, they pull in your waistline and improve steadiness during everyday movements such as reaching or turning.
Muscles Trained: Obliques, deep core stabilisers
How to Do It:
- Stand with your feet hip-width apart and knees slightly bent
- Hold your arms out in front of you at chest height with your palms together
- Keep your hips facing forward
- Rotate your upper body to the right, turning as far as comfortable
- Return to centre, then rotate to the left
- Move smoothly and with control throughout
Recommended Sets and Reps: 15 to 20 rotations each side, working up to 3 sets
Common Mistakes to Avoid:
- Rotating from your hips instead of your waist; your hips should stay still and facing forward throughout
- Swinging your whole lower body, which removes the work from the obliques and risks straining your lower back.
Standing Side Bend
Side bends target the obliques and the muscles running along your sides. These muscles are often neglected in daily life, so strengthening them can greatly change your waist measurement and create a more defined shape.
Muscles Trained: Obliques, lateral trunk muscles
How to Do It:
- Stand with your feet shoulder-width apart
- Place your right hand on your hip and extend your left arm overhead
- Bend slowly to the right, sliding your right hand down your thigh while your left arm reaches over your head
- You should feel a stretch along your left side
- Return to the starting position and repeat on the other side
Recommended Sets and Reps: 12 to 15 bends each side for 2 to 3 sets
Common Mistakes to Avoid:
- Leaning forward or backward as you bend, which turns it into a different exercise and reduces effectiveness for the waist
- Moving out of one plane of movement; think of standing between two panes of glass and keeping your body flat against them throughout.
RELATED: The 7-Minute Standing Routine That Shrinks Hip Dip Fat After 45, According to a Trainer
Standing Knee to Elbow
This exercise combines core rotation with hip flexion, working both your obliques and your deeper abdominal muscles. It also improves balance and coordination, which becomes increasingly important after 60.
Muscles Trained: Obliques, deep abdominals, hip flexors
How to Do It:
- Stand with your feet hip-width apart and your hands behind your head
- Lift your right knee up and across your body while bringing your left elbow down to meet it
- Return to the starting position
- Repeat on the other side (left knee to right elbow)
Recommended Sets and Reps: Start with 10 to 12 reps per side for 2 sets; work up to 15 to 20 per side for 3 sets as you get stronger
Common Mistakes to Avoid:
- Rushing through the movement and barely lifting the knee; you want to bring your knee up as high as comfortable and really contract your core as your elbow comes down
- Treating it as a speed exercise; this is about feeling your muscles work, not getting through reps quickly
Standing Wood Chop
The wood chop movement engages your entire core through a diagonal rotation that mimics real-life movements. It works your obliques, rectus abdominis, and the stabilising muscles around your spine, all which add to a tighter waist.
Muscles Trained: Obliques, rectus abdominis, spinal stabilisers
How to Do It:
- Stand with your feet slightly wider than shoulder-width apart
- Clasp your hands together, or hold a light weight if you have one
- Start with your hands up near your right shoulder
- Sweep them down diagonally across your body toward your left hip, as if chopping wood
- Keep your arms relatively straight and let your torso rotate with the movement
- Return to the starting position and complete all reps on one side before switching
Recommended Sets and Reps: 12 to 15 chops each side for 2 to 3 sets
Common Mistakes to Avoid:
- Bending your back or hunching over as you chop down; the movement should come from rotating your torso while keeping your spine neutral
- Rounding your back, which puts unnecessary strain on it and removes the core engagement that makes this exercise effective.
RELATED: 4 Bed Exercises That Restore Thigh Strength Faster Than Leg Press After 65
Standing March with Twist
This exercise combines cardio with core work, getting your heart rate up slightly while specifically targeting your waist through rotation. The marching component also improves hip mobility and balance.
Muscles Trained: Obliques, hip flexors, core stabilisers
How to Do It:
- Stand tall with your hands behind your head
- March in place, lifting your knees high
- As your right knee comes up, rotate your upper body to bring your left elbow toward that knee
- As your left knee comes up, rotate to bring your right elbow toward it
- Keep marching and twisting in a rhythmic pattern
Recommended Sets and Reps: Start with 30 seconds to 1 minute of continuous marching with twists; work up to 2 to 3 minutes as your fitness improves
Common Mistakes to Avoid:
- Dropping your elbows forward instead of rotating your torso; your hands should stay behind your head throughout, with the rotation coming from your core
- Letting your chest drop or your back round; keep your chest lifted throughout.
How to Fit These Into Your Week

Start with 2 to 3 sessions per week, leaving at least one day between sessions for recovery. You can do all five exercises in one session, or split them up throughout the week assuming that feels more manageable.
A typical session: perform each exercise for the recommended reps or time, rest for 30 to 60 seconds between exercises, then repeat the circuit 2 to 3 times. The whole session shouldn’t take more than 15 to 20 minutes once you’re familiar with the movements.
You can do these on their own or add them to your existing walking routine. Some clients do their standing exercises in the morning and walk later in the day. Others prefer a short walk as a warm-up, then the exercises. There’s no single right way, just whatever helps you stick with it.
Check with your doctor before starting if you have uncontrolled high blood pressure, recent surgery (especially abdominal surgery), severe osteoporosis, significant balance problems, or any heart condition. If you experience sharp pain, dizziness, chest pain, or severe shortness of breath during these exercises, stop immediately and get medical advice.
Anyone with lower back issues should be particularly careful with the twisting movements. Disc problems, sciatica, or chronic back pain all warrant a conversation with your doctor or physiotherapist before beginning.
RELATED: 5 Dumbbell Exercises That Restore Shoulder Strength Faster Than Lifting Weights After 55
What to Expect After 4 to 6 Weeks
After 4 to 6 weeks of steady training, at minimum twice a week, you can expect your waist size to drop by 1 to 2 inches. For some it will be more, for some less, depending on your fitness level, diet, and how much visceral fat you carry.
The first signs you’ll notice aren’t in the mirror. You’ll feel better posture and stronger core muscles before you see any visual change. Your clothes will fit differently before you notice a drastic decrease in your waist measurement. Trousers that are now tight around the waist will loosen. You’ll stand taller without thinking about it.
Visual results aren’t only about losing fat; you’re also toning muscles. Even if you don’t lose as much weight as you expect, you’ll notice your waist is smaller and more defined as your abdominal muscles tighten and hold everything together.
Diet Matters More Than You Think

Diet is the single biggest factor in whether you see results. You can’t out-train a bad diet, no matter how consistently you train. If you’re consuming a lot more calories than your body burns, you’ll still build muscle underneath, but you won’t be able to see it through the body fat.
Most people who succeed make small adjustments rather than dramatic ones: less processed food, more protein and vegetables, less alcohol, and more awareness of portion sizes. The exercise builds the base. Your diet determines how much of that result becomes visible.
Frequency matters more than intensity. Training twice a week for six months will give you better results than training every day for three weeks and then stopping. Be consistent, be patient, and the results will come.
The post 5 Standing Exercises That Shrink Stubborn Waist Thickening Faster Than Cardio After 60 appeared first on Eat This Not That.
]]>The post The 7-Minute Standing Routine That Shrinks Hip Dip Fat After 45, According to a Trainer appeared first on Eat This Not That.
]]>Why Hip Dip Fat Is So Stubborn

Hip dips are indentations between your hip bone and the top of your thigh. They’re completely normal and their visibility has nothing to do with fitness level. What people call “hip dip fat” is actually fat that sits around this area and becomes more noticeable as we age.
After 45, hormonal changes during perimenopause and menopause shift where your body stores fat. Oestrogen levels drop and your body starts storing more fat around your hips, thighs and lower abdomen. The fat cells in these areas also become more resistant to being broken down. Your metabolism slows by about 2–8% per decade after 40, which means your body burns fewer calories at rest.
The biggest mistake people make is thinking they can spot reduce this area. You cannot target fat loss in one specific part of your body. Doing hundreds of side leg lifts or hip abductions won’t burn the fat around your hip dips. Your body decides where it loses fat, and it’s largely determined by genetics and hormones.
The second mistake is focusing only on cardio. While cardio burns calories during the session, it doesn’t do much after you’ve finished. Women over 45 need to build and maintain muscle mass because we lose about 3–8% of our muscle per decade after 30. Less muscle means a slower metabolism, which means fewer calories burned throughout the day.
The third mistake is doing exercises lying down. Most floor exercises for hips don’t actually create enough resistance to stimulate real change. They might make the area feel like it’s working, but they’re not challenging enough to build muscle or burn significant calories.
RELATED: 4 Bed Exercises That Restore Thigh Strength Faster Than Leg Press After 65
Why Standing Beats Floor Work
Standing exercises work your entire body at once. When you’re on the floor doing leg lifts, you’re only moving one limb. When you’re standing, your core has to stabilise your torso, your supporting leg has to hold your weight, and your working leg has to move against gravity. This burns more calories and builds more muscle.
Standing exercises also improve your functional fitness. We don’t spend our daily lives on the floor doing leg lifts. We stand, we walk, we climb stairs, we reach for things. Training in standing positions makes you stronger for the movements you actually do, which means better balance and more confidence in daily activities.
For women over 45, standing work is also easier on your joints. Getting down and up from the floor repeatedly can be hard on knees and hips. Standing exercises let you work just as hard without that stress.
Standing routines build bone density better than floor work, too. Weight-bearing exercises send signals to your bones to stay strong — especially important after 45 when bone density naturally declines.
And standing exercises can be progressed more easily. You can add weights, change your stance width, increase your range of motion or adjust your speed. Floor exercises are much harder to increase in complexity once you’ve mastered them.
Side Step Squats
This exercise works your glutes, outer thighs and core while burning calories. The lateral movement targets the muscles around your hips, and the squat position engages your entire lower body.
Muscles Trained: Glutes, outer thighs, core
How to Do It:
- Stand with feet hip-width apart
- Step your right foot out to the side about two feet
- Bend both knees and push your hips back like you’re sitting into a chair
- Keep your chest up and your weight in your heels
- Push back to standing and bring your feet together
- Repeat on the left side, alternating for 90 seconds
Avoid These Mistakes:
- Don’t let your knees collapse inward — they should track in the same direction as your toes
- Don’t just drop straight down — your hips should move back and down, not just down
- Don’t rush through it — slow down and control the movement; you should feel your outer thighs and glutes working.
RELATED: 5 Dumbbell Exercises That Restore Shoulder Strength Faster Than Lifting Weights After 55
Standing Side Leg Raises with Pulse
This exercise directly works the muscles on the outside of your hip and thigh. The pulse at the top keeps the muscle under tension for longer, which builds strength and burns more calories.
Muscles Trained: Hip abductors, outer thighs
How to Do It:
- Stand tall with your feet together
- Shift your weight onto your left leg
- Lift your right leg out to the side about 12 inches off the ground
- At the top, pulse up and down in a small range (about 2 inches) for three pulses
- Lower your leg back down with control
- Do 45 seconds on each side
Avoid These Mistakes:
- Don’t lift your leg too high — this causes you to lean your torso to the opposite side, taking the work out of the target muscles and putting it into your lower back
- Don’t swing the leg — the movement should be controlled both up and down
- If you’re losing balance, hold onto a chair or wall with one hand.
Curtsy Lunges
Curtsy lunges work your glutes from a different angle than regular lunges. They also challenge your balance and work your inner and outer thighs at the same time.
Muscles Trained: Glutes, inner thighs, outer thighs
How to Do It:
- Stand with feet hip-width apart
- Step your right foot back and across behind your left leg like you’re doing a curtsy
- Bend both knees and lower down until your back knee is close to the floor
- Keep your front knee over your front ankle
- Push through your front heel to stand back up
- Alternate legs for 90 seconds
Avoid These Mistakes:
- Don’t let your front knee cave inward — keep it aligned with your toes
- Don’t step back too narrowly — the wider you step, the more you’ll work your glutes
- Don’t lean forward — keep your chest up and your core engaged
- If you’re struggling with balance, reduce your range of motion or hold onto something until you build strength.
RELATED: 5 Daily Exercises That Restore Full-Body Strength Faster Than Gym Sessions After 60
Lateral Step Ups
This exercise combines strength and cardio. It works your glutes, thighs and core while getting your heart rate up. The stepping motion also improves your functional fitness for stairs.
Muscles Trained: Glutes, quads, hamstrings, core
How to Do It:
- Stand next to a sturdy step or box about knee height
- Place your right foot on the step
- Push through your right heel to lift your body up onto the step
- Bring your left foot up to meet your right
- Step back down with your left foot first, then your right
- Do 45 seconds leading with your right leg, then 45 seconds leading with your left
Avoid These Mistakes:
- Don’t push off with your bottom foot — the work should come from the leg on the step, not the leg on the ground
- Don’t use momentum — control the movement both up and down
- Don’t start with a step that’s too high — begin lower and progress as you get stronger; if your knee comes past your toes at the bottom, the step is too high.
Standing Hip Circles
This exercise works your hips through their full range of motion. It strengthens the muscles around your hip joint and improves mobility, which tends to decrease after 45.
Muscles Trained: Hip flexors, glutes, hip abductors and adductors
How to Do It:
- Stand on your left leg with your right leg lifted slightly off the ground
- Draw circles in the air with your right knee, making them as large as you can control
- Do 45 seconds clockwise, then 45 seconds anticlockwise
- Switch legs
Avoid These Mistakes:
- Don’t make the circles too small — challenge yourself to make them larger while keeping your torso stable
- Don’t let your hips shift around — your standing hip should stay stacked over your ankle
- Don’t hold your breath — keep breathing normally throughout
- Hold onto a wall or chair if you need support for balance.
RELATED: 5 Park Bench Exercises That Restore Leg Muscle Faster Than Squats After 60
How to Structure Your Routine
Do this routine as a circuit, moving from one exercise straight into the next with no rest between exercises. This keeps your heart rate up and burns more calories in a short time.
Start with a brief warmup: march in place for 30 seconds, do some arm circles and a few gentle hip rotations. This gets blood flowing to your muscles and reduces injury risk.
Work through all five exercises in order. The total work time is 7.5 minutes. After you finish the last exercise, walk around for 30 seconds to a minute to bring your heart rate down gradually. Don’t sit down immediately.
Do this routine 4–5 times per week for the best results. Your body needs rest days to recover and build muscle. Three times per week is the minimum to see changes, but more frequent sessions will give you faster results.
You can do this routine on its own or add it to the end of a walk. It works well as a finisher after cardio, or on days when you’re doing upper body work.
After about four weeks of consistent training, progress the routine. Add light ankle weights or small dumbbells, increase your range of motion on each exercise, move more slowly to increase time under tension, or add an extra round of the circuit if you have time.
What Results to Expect
In the first two weeks, you won’t notice any visual results — but you will feel the difference. The workouts will become easier, your balance will improve, and you’ll feel more energised throughout the day. That’s how you’ll know your muscles are getting stronger.
After a month, you might notice your pants sitting slightly better on your hips and thighs. The area will feel a bit tighter when you press on it. Going up the stairs or getting in and out of your car will probably become easier, and your posture will likely improve without you even noticing.
After two months, other people will probably start to notice that you look different. Your lower body will be taking shape, your hips and thighs will be more toned, and the fat around the hip dips will feel tighter. With consistent exercise and managed nutrition, some fat loss around the area is realistic.
After three months, you’ll start to notice an actual change in muscle tone. Your legs will be stronger, your balance will have improved markedly, and the muscles around your hips will be strong enough to make the hip dips less noticeable — even if they’re still there.
Keep in mind that hip dips are part of your bone structure. Results will vary from woman to woman. The goal isn’t to remove a part of your anatomy that’s meant to be there — it’s to strengthen your muscles and reduce the fat around the area. Some women will notice significant results, others moderate results. Either way, if you’re stronger and healthier than when you started, that’s a real win.
RELATED: The 6-Minute Bed Routine That Restores Full-Body Balance After 65
The Nutrition Factor

You cannot out-exercise a bad diet. This 7-minute workout burns around 50–70 calories — less than a small banana. Exercise will make you more muscular and fitter, but it won’t remove fat on its own. To lose fat around your hip dips, or anywhere else, you need to be in a calorie deficit. That means consuming slightly fewer calories than your body uses each day. A deficit of 300–500 calories per day will result in a slow and sustainable loss of around 0.5–1lb per week.
Once you’re over 45, you need more protein. Aim for around 0.8–1g of protein per lb of body weight per day. Protein helps you maintain or even build muscle, which keeps your metabolism higher. It also keeps you full, making it easier to stay in a deficit. Good sources include lean meats, fish, eggs, Greek yoghurt, cottage cheese and legumes.
Cut down on processed foods and added sugars. They provide a lot of calories for very little nutrition and they won’t keep you full. Focus instead on whole foods — vegetables, fruits, whole grains, lean proteins and healthy fats. They provide more nutrition per calorie and will keep your energy levels more stable.
Drink plenty of water. Sometimes you can feel hungry when you’re actually just thirsty. Aim for around 2 litres per day, more if you’re exercising or it’s hot.
Don’t cut your calories too low. This will slow your metabolism, cause you to lose muscle alongside fat, and leave you feeling tired and irritable — which you won’t be able to sustain long term. A moderate deficit you can stick to is always better than a severe one you can’t.
Fat loss isn’t always linear. Some weeks you’ll notice changes and some weeks you won’t. All that matters is the trend over months, not over any given week. Consistency is everything — with both exercise and nutrition.
The post The 7-Minute Standing Routine That Shrinks Hip Dip Fat After 45, According to a Trainer appeared first on Eat This Not That.
]]>The post 5 Standing Exercises That Shrink Waist Overhang Faster Than Weight Training After 60 appeared first on Eat This Not That.
]]>Over years of coaching, I’ve seen a clear pattern in exercises that help people feel leaner and stronger through the waist. Movements that recruit the legs, hips, and upper body simultaneously naturally raise heart rate and encourage the body to burn more energy. At the same time, the core has to stay engaged to keep everything stable. That combination often delivers far more return than isolated midsection work.
The five standing exercises below tap into that full-body effect. They keep the body moving, activate major muscle groups, and challenge the core from start to finish. Perform them consistently, and you’ll build strength, increase calorie burn, and support the kind of training that helps reduce waist overhang over time.
High Knees
High knees combine core engagement with quick lower-body movement. Each time the knee drives upward, the abdominals and hip flexors work together to stabilize the torso. The fast tempo also increases heart rate and encourages greater calorie burn. Many people notice their core automatically bracing to keep the body upright. Over time, this movement helps strengthen the midsection while improving coordination and conditioning.
Muscles Trained: Hip flexors, lower abdominals, quads, and calves.
How to Do It:
- Stand tall with your feet hip-width apart.
- Begin jogging in place.
- Drive one knee upward toward your chest.
- Quickly switch legs while maintaining a steady rhythm.
- Continue alternating knees at a controlled pace.
Recommended Sets and Reps: Perform 3 sets of 30 seconds. Rest for 30 seconds between each set.
Best Variations: Slow high knees, marching high knees, band-resisted high knees.
Form Tip: Keep your chest tall and drive your knees upward rather than leaning back.
RELATED: 4 Bed Exercises That Shrink Stubborn Midsection Faster Than Ab Workouts After 60
Jumping Jacks
Jumping jacks are a classic movement for a reason. They involve the entire body while encouraging continuous motion. The arms and legs move together, which forces the core to stabilize the torso throughout the exercise. This combination quickly raises heart rate and increases overall energy output. When performed consistently, jumping jacks help strengthen the core while improving endurance.
Muscles Trained: Shoulders, hips, calves, and core.
How to Do It:
- Stand with your feet together and your arms at your sides.
- Jump your feet outward while raising your arms overhead.
- Land softly with your knees slightly bent.
- Jump your feet back together while lowering your arms.
- Continue repeating the motion in a steady rhythm.
Recommended Sets and Reps: Perform 3 sets of 30 seconds. Rest for 30 seconds between each set.
Best Variations: Low-impact step jacks, slow jumping jacks, power jacks.
Form Tip: Land softly and maintain a steady rhythm throughout the movement.
Medicine Ball Slams
Medicine ball slams combine power, coordination, and full-body engagement. The downward slam activates the core while the hips and shoulders generate force. This explosive movement encourages the entire body to work together. Because the exercise recruits large muscle groups, it also increases calorie expenditure. Over time, slams help strengthen the muscles that wrap around the waist.
Muscles Trained: Core, shoulders, lats, and hips.
How to Do It:
- Stand with your feet shoulder-width apart while holding a medicine ball.
- Raise the ball overhead with both hands.
- Brace your core and slam the ball toward the floor.
- Catch or retrieve the ball as it rebounds.
- Reset and repeat the movement.
Recommended Sets and Reps: Perform 3 sets of 10 to 12 reps. Rest for 45 seconds between each set.
Best Variations: Rotational slam, alternating slam, overhead slam.
Form Tip: Engage your core before slamming the ball downward.
RELATED: The 5-Minute Standing Routine That Restores Posture After 60, According to a Trainer
Squat Jumps
Squat jumps train the legs and core while encouraging explosive power. Lowering into the squat activates the quads and glutes, while the jump requires the body to produce force quickly. The core works to stabilize the torso during both the jump and the landing. This combination challenges the entire lower body while increasing energy output. With regular practice, squat jumps help build strength and conditioning simultaneously.
Muscles Trained: Quads, glutes, calves, and core.
How to Do It:
- Stand with your feet shoulder-width apart.
- Lower your body into a squat position.
- Drive through your feet and jump upward.
- Land softly with your knees slightly bent.
- Reset your stance and repeat.
Recommended Sets and Reps: Perform 3 sets of 8 to 10 reps. Rest for 60 seconds between each set.
Best Variations: Pause squat jump, low-impact squat jump, box squat jump.
Form Tip: Land softly and absorb the impact through your hips and knees.
Suitcase Carry
The suitcase carries the challenge of the core in a subtle yet powerful way. Holding weight on one side forces the abdominal muscles to stabilize the torso, preventing leaning. This creates continuous tension through the obliques and deep core muscles. Walking while holding the weight also recruits the hips and shoulders. Over time, suitcase carrying helps strengthen the muscles that support the waistline and improve posture.
Muscles Trained: Obliques, core stabilizers, shoulders, and grip.
How to Do It:
- Hold a dumbbell or kettlebell in one hand at your side.
- Stand tall with your shoulders level.
- Brace your core and begin walking forward.
- Maintain steady steps and an upright posture.
- Switch hands after completing the distance.
Recommended Sets and Reps: Perform 3 sets of 30 to 40 seconds per side. Rest for 45 seconds between each set.
Best Variations: Farmer carry, front rack carry, kettlebell carry.
Form Tip: Keep your shoulders level and avoid leaning toward the weight.
RELATED: 4 Standing Exercises That Restore Thigh Strength Faster Than Squats After 60
Best Daily Habits That Help Reduce Waist Overhang After 60

Reducing waist overhang becomes easier when exercise works alongside supportive daily habits. Strength training and movement increase energy output while helping the body maintain muscle mass. When combined with healthy lifestyle choices, these habits encourage the body to gradually reduce excess fat.
- Train large muscle groups regularly: Full-body movements increase energy expenditure and stimulate more muscle.
- Stay consistent with movement: Daily activity helps maintain calorie burn throughout the week.
- Prioritize protein intake: Protein supports muscle maintenance while encouraging satiety.
- Support workouts with sleep and recovery: Quality sleep helps regulate hormones that influence body composition.
- Maintain a balanced routine: Combining strength, movement, and healthy habits encourages long-term results.
References
- Donnelly, Joseph E et al. “Aerobic exercise alone results in clinically significant weight loss for men and women: midwest exercise trial 2.” Obesity (Silver Spring, Md.) vol. 21,3 (2013): E219-28. doi:10.1002/oby.20145
- Cox, Carla E. “Role of Physical Activity for Weight Loss and Weight Maintenance.” Diabetes spectrum : a publication of the American Diabetes Association vol. 30,3 (2017): 157-160. doi:10.2337/ds17-0013
The post 5 Standing Exercises That Shrink Waist Overhang Faster Than Weight Training After 60 appeared first on Eat This Not That.
]]>The post 4 Bed Exercises That Shrink Stubborn Midsection Faster Than Ab Workouts After 60 appeared first on Eat This Not That.
]]>According to Karen Ann Canham, CEO and founder of Karen Ann Wellness, Board-Certified Wellness Coach, and Nervous System Specialist who has almost two decades of experience in wellness and corporate leadership, bed exercises are productive because they lessen strain on the joints while consistently engaging the core and hips. Plus, the mattress offers support so your muscles can be engaged without experiencing tension in the lower back or neck.
Below, Canham breaks down four excellent bed exercises that will help shrink your midsection quicker than ab workouts alone.
Clamshell
- Lie on your side with your knees stacked and bent.
- Keep your feet together as you lift your top knee, like a clamshell opening.
- Lower.
- Avoid rotating through your lower back.
- Perform 2 sets of 12 reps.
RELATED: 4 Simple Changes That Burn Belly Fat Without Exercise After 40
Side-Lying Leg Lifts
- Begin by lying on one side with your legs stacked, your head resting on your bottom arm, and your top hand placed on your hip.
- Lift your top leg upward.
- Hold it for a moment.
- Slowly lower.
- Repeat on the other side.
- Perform 2 sets of 15 reps on each side.
RELATED: 5 Walking Exercises That Flatten Your Stomach Better Than Gym Machines After 50
Heel Slides
- Start by lying flat on your back with your legs on the mattress.
- Place your arms at your sides and gently press your lower back into the mattress.
- Slide one heel back toward your hips before lengthening it back out.
- Complete 2 sets of 10 reps on each side to boost joint mobility and the hip flexors.
Glute Bridges
- Begin by lying flat on your back with bent knees and feet hip-width apart on the mattress, arms at your sides with palms pressing into the ground.
- Press through your heels to lift your hips until your body forms a straight line from head to heels.
- Squeeze your buttocks, holding at the top for a moment.
- Lower your hips back to the start position.
- Perform 2 sets of 12 reps.
The post 4 Bed Exercises That Shrink Stubborn Midsection Faster Than Ab Workouts After 60 appeared first on Eat This Not That.
]]>The post 5 Chair Exercises That Shrink Apron Belly Faster Than Gym Classes After 60 appeared first on Eat This Not That.
]]>Another factor people overlook involves comfort and accessibility. When exercises feel safe and manageable, people perform them more often and with better form. Chair-based workouts remove balance concerns while allowing the abdominal muscles to engage through controlled movement. This support makes it easier to focus on tightening the midsection during every repetition.
Consistency also plays a major role. Many of my older clients see noticeable improvements once they begin practicing a few focused core movements daily rather than relying on one or two weekly gym sessions. Small, controlled exercises performed regularly often restore muscle tone in the lower abdomen more effectively than longer, less targeted workouts.
The following chair exercises strengthen the deep core muscles, hip flexors, and stabilizers that support the lower stomach. Move slowly, tighten the midsection during each repetition, and maintain upright posture throughout the routine. Over time, these movements help rebuild the muscle support that naturally pulls the belly inward.
Seated Knee Tucks
Seated knee tucks activate the lower abdominal muscles while keeping the back supported and the movement controlled. I frequently start clients with this exercise because it teaches the core to engage properly without placing strain on the spine. The motion of drawing the knees toward the chest forces the lower abs to contract, which directly targets the area most responsible for belly overhang.
As the legs extend away from the body again, the abdominal muscles must continue working to stabilize the torso. This constant tension builds strength and improves control of the lower midsection. With regular practice, many people notice the lower stomach beginning to feel firmer and more responsive during daily movement.
How to Do It
- Sit near the edge of a sturdy chair
- Lean back slightly while keeping your back straight
- Pull both knees toward your chest
- Extend the legs forward slowly
- Repeat with controlled movement.
RELATED: 5 Standing Exercises That Restore Glute Strength Faster Than Squats After 60
Seated Leg Lifts
Seated leg lifts strengthen the lower portion of the abdominal wall while encouraging good posture. I often recommend this movement because it isolates the lower core without requiring people to lie on the floor, which many older clients prefer to avoid.
Lifting the legs slightly off the ground forces the abdominal muscles to stabilize the torso and control the movement. When performed slowly, the core remains engaged for the entire repetition. This continuous tension helps rebuild strength in the muscles that hold the stomach flat.
How to Do It
- Sit upright with feet flat on the floor
- Tighten your abdominal muscles
- Lift one leg a few inches off the ground
- Lower slowly
- Alternate legs steadily.
Seated Twist
The seated twist strengthens the oblique muscles along the sides of the abdomen. These muscles help support the entire abdominal wall and play a major role in tightening the midsection. When they grow stronger, the waistline often begins to feel more stable and controlled.
I frequently include this exercise in chair workouts because it improves both core strength and spinal mobility. Slow, controlled rotations encourage the abdominal muscles to engage while maintaining good posture throughout the movement.
How to Do It
- Sit upright with hands resting near your chest
- Tighten the abdominal muscles
- Rotate your torso gently to one side
- Return to center
- Alternate sides slowly.
RELATED: If You Can Hold These 3 Bed Positions After 60, Your Core Is Stronger Than 90% of Peers
RELATED: 5 Daily Exercises That Restore Hip Mobility Faster Than Floor Stretches After 55
Seated March
The seated march strengthens the hip flexors and lower abdominal muscles at the same time. This coordinated movement trains the core to stabilize the body while the legs move independently. I often see clients regain better abdominal control once they practice this exercise regularly.
As one knee lifts upward, the core must tighten to keep the torso from leaning backward. This small but powerful contraction strengthens the deep stabilizing muscles that support the stomach.
How to Do It
- Sit tall with feet flat on the floor
- Lift one knee toward your chest
- Keep your core muscles tight
- Lower slowly
- Alternate legs continuously.
RELATED: If You Can Hold These 3 Bed Positions After 60, Your Core Is Stronger Than 90% of Peers
Seated Forward Reach
The seated forward reach strengthens the upper abdominal muscles while encouraging better posture. I often use this movement at the end of a core routine because it helps engage the entire abdominal wall while maintaining controlled breathing.
Reaching forward while tightening the stomach forces the core to support the spine. When the movement remains slow and deliberate, the abdominal muscles stay under tension throughout the entire motion.
How to Do It
- Sit upright with arms extended forward
- Tighten your abdominal muscles
- Reach forward slightly from the waist
- Return to upright posture slowly
- Repeat with control.
The post 5 Chair Exercises That Shrink Apron Belly Faster Than Gym Classes After 60 appeared first on Eat This Not That.
]]>The post 5 Standing Exercises That Flatten Stubborn Belly Pooch Faster Than Crunches After 55 appeared first on Eat This Not That.
]]>That’s where standing exercises shine. Movements that involve the hips, legs, and upper body simultaneously elevate heart rate, stimulate more muscle groups, and increase calorie output. I’ve seen this approach work well with many clients over 55 who want workouts that feel productive without demanding hours in the gym. Big compound movements help the body work harder while also strengthening the core muscles that support the midsection.
The exercises below combine strength and movement to create a potent training effect. Each one recruits large muscle groups while keeping the core active and stable. Perform them regularly, and you’ll build strength, increase calorie burn, and support training that helps flatten stubborn belly pooch.
RELATED: 4 Standing Exercises That Restore Stair-Climbing Strength Faster Than Lunges After 60
Side Slams
Side slams combine rotation, power, and full-body engagement in a single movement. The explosive downward slam activates the obliques while the legs and hips generate force. That combination challenges the core while elevating heart rate and increasing calorie burn. Rotational exercises also strengthen the muscles that wrap around the waistline. Over time, stronger obliques help support a tighter midsection.
Muscles Trained: Obliques, shoulders, core, and hips.
How to Do It:
- Stand with your feet shoulder-width apart while holding a medicine ball.
- Raise the ball above one shoulder.
- Rotate your torso as you slam the ball down toward the opposite side.
- Catch or retrieve the ball and reset your position.
- Repeat the movement on the opposite side, switching each rep.
Recommended Sets and Reps: Perform 3 sets of 10 to 12 reps per side. Rest for 45 seconds between each set.
Best Variations: Rotational slam, overhead slam, alternating slam.
Form Tip: Rotate through your torso while keeping your feet planted and your core braced.
Kettlebell High Pulls
Kettlebell high pulls train explosive hip extension while challenging the upper body and core. The powerful hip drive recruits large muscle groups in the glutes and legs. As the kettlebell travels upward, the core stabilizes the torso to control the movement. This type of full-body effort increases energy output and strengthens multiple muscle groups at once. Consistent practice builds strength and supports fat loss efforts.
Muscles Trained: Glutes, hamstrings, shoulders, and core.
How to Do It:
- Stand with your feet shoulder-width apart, holding a kettlebell in both hands.
- Hinge your hips back and allow the kettlebell to swing between your legs.
- Drive your hips forward powerfully.
- Pull the kettlebell upward toward chest height.
- Lower the kettlebell with control and repeat.
Recommended Sets and Reps: Perform 3 sets of 10 to 12 reps. Rest for 60 seconds between each set.
Best Variations: Single-arm high pull, kettlebell swing-to-high pull, alternating high pull.
Form Tip: Generate the movement from your hips rather than pulling with your arms.
RELATED: 5 Exercises You Can Do in Your Bedroom That Restore Full-Body Strength After 60
Dumbbell Squat to Press
The dumbbell squat-to-press combines two compound movements into a powerful exercise. The squat activates the legs and glutes while the press challenges the shoulders and core. This full-body effort increases muscle recruitment and calorie expenditure. The core remains active throughout the entire movement to stabilize the spine. Over time, this exercise strengthens the entire body while supporting fat-burning workouts.
Muscles Trained: Quads, glutes, shoulders, and core.
How to Do It:
- Hold a dumbbell in each hand at shoulder height.
- Stand with your feet shoulder-width apart.
- Lower into a squat while keeping your chest upright.
- Drive upward through your heels.
- Press the dumbbells overhead as you stand.
Recommended Sets and Reps: Perform 3 sets of 8 to 10 reps. Rest for 60 seconds between each set.
Best Variations: Single-dumbbell thruster, kettlebell thruster, alternating press thruster.
Form Tip: Brace your core before pressing the weights overhead.
Step-Ups
Step-ups strengthen the lower body while increasing heart rate and overall workload. Each step challenges the glutes and quads while the core stabilizes the body during the movement. This combination improves lower-body strength and contributes to higher calorie expenditure. The movement also mimics everyday activities such as climbing stairs. Over time, step-ups build strength and endurance while supporting fat-burning workouts.
Muscles Trained: Quads, glutes, hamstrings, and core.
How to Do It:
- Stand in front of a sturdy bench or step.
- Place one foot firmly on top of the platform.
- Drive through that foot to lift your body upward.
- Briefly bring the opposite foot onto the platform.
- Step back down with control and repeat.
Recommended Sets and Reps: Perform 3 sets of 10 reps per leg. Rest for 60 seconds between each set.
Best Variations: Weighted step-ups, alternating step-ups, knee-drive step-ups.
Form Tip: Push through your front heel to activate the glutes.
RELATED: 5 Daily Exercises Men Over 55 Should Do to Restore Lost Muscle
Kettlebell Swing
Kettlebell swings train explosive hip movement while engaging the entire posterior chain. The glutes and hamstrings drive the motion while the core stabilizes the spine. This repeated full-body effort elevates heart rate and increases calorie burn. Swings also strengthen the muscles that support posture and athletic movement. With consistent training, they become one of the most efficient exercises for building strength and energy output.
Muscles Trained: Glutes, hamstrings, core, and lower back stabilizers.
How to Do It:
- Stand with your feet slightly wider than shoulder width.
- Hold a kettlebell with both hands in front of your hips.
- Hinge your hips back and swing the kettlebell between your legs.
- Drive your hips forward to propel the kettlebell to chest height.
- Allow the kettlebell to swing back down and repeat.
Recommended Sets and Reps: Perform 3 sets of 12 to 15 reps. Rest for 60 seconds between each set.
Best Variations: Single-arm swing, alternating swing, heavy power swing.
Form Tip: Snap your hips forward and keep your core braced during each swing.
RELATED: 5 Standing Exercises That Reduce Waist Thickening Faster Than Cardio After 55
Daily Habits That Help Flatten Belly Pooch After 55

Shrinking a belly pooch becomes much easier when exercise is paired with supportive daily habits. Training stimulates muscles and increases energy output, yet long-term fat loss also depends on lifestyle factors. When strength training, nutrition, and recovery align, the body becomes far more efficient at maintaining a healthy body composition.
- Create a small calorie deficit: Fat loss occurs when the body consistently burns more calories than it consumes.
- Prioritize protein intake: Protein supports muscle maintenance and helps keep you satisfied between meals.
- Train large muscle groups regularly: Exercises that involve the legs, hips, and upper body increase calorie expenditure.
- Stay consistent with movement: Daily walks and regular workouts help maintain energy output throughout the week.
- Prioritize sleep and recovery: Adequate sleep supports hormonal balance and overall metabolic health.
Combine these habits with the exercises above, and you’ll create a routine that supports a stronger body and a tighter midsection.
References
- Brobakken, Mathias Forsberg et al. “Abdominal aerobic endurance exercise reveals spot reduction exists: A randomized controlled trial.” Physiological reports vol. 11,22 (2023): e15853. doi:10.14814/phy2.15853
- Saeidifard, Farzane et al. “Differences of energy expenditure while sitting versus standing: A systematic review and meta-analysis.” European journal of preventive cardiology vol. 25,5 (2018): 522-538. doi:10.1177/2047487317752186
The post 5 Standing Exercises That Flatten Stubborn Belly Pooch Faster Than Crunches After 55 appeared first on Eat This Not That.
]]>The post 5 Standing Exercises That Reduce Waist Thickening Faster Than Cardio After 55 appeared first on Eat This Not That.
]]>Why standing exercises? They’re extremely effective in trimming down your waist by activating the entire core. By standing upright, you’re moving against gravity and boosting the calorie burn. You’ll notice your waist trimming down in no time!
“After 55, several physiological changes make abdominal fat easier to gain and harder to lose,” explains Karen Ann Canham, CEO and founder of Karen Ann Wellness, Board-Certified Wellness Coach, and Nervous System Specialist who has almost two decades of experience in wellness and corporate leadership. “First, sarcopenia—the natural loss of muscle mass with age—reduces resting metabolic rate. With less muscle tissue, the body burns fewer calories at rest, making fat accumulation more likely, particularly around the midsection. Second, hormonal changes, including declines in estrogen and testosterone, tend to shift fat storage toward the abdomen. Many adults notice increased central fat even if their overall weight hasn’t changed dramatically.”
In addition, sleep disturbances and chronic stress can heighten cortisol levels, which are connected to increased fat storage in the abdominal region.
While performing cardio promotes a healthy heart, it typically falls short when it comes to providing stimulus to maintain or build muscle mass.
“Standing strength exercises recruit multiple muscle groups at once, increasing overall metabolic demand and helping maintain lean muscle mass,” Canham says. “When adults preserve or build muscle—especially in the legs, hips, and core—they increase resting metabolic rate, meaning the body burns more energy throughout the day.”
Below, Canham shares five standing exercises that reduce waist thickening quicker than cardio alone after 55.
Standing Knee Lifts
“Standing knee lifts with core engagement activate the lower abdominals and hip flexors while maintaining upright posture,” Canham says.
- Start by standing tall with your feet hip-width apart and arms at your sides.
- Lift your left knee up to hip height while keeping your core engaged.
- Lower your foot and repeat on your right side, lifting your right knee up to hip level.
- Continue to alternate knee lifts.
- Perform 2 to 3 sets of 12 to 15 reps on each leg.
RELATED: 5 Easy Standing Exercises That Will Melt Your Love Handles Right Off After 40
Standing Torso Rotations
“Standing torso rotations strengthen the obliques and improve rotational mobility,” Canham says.
- Start standing tall with your feet hip-width apart.
- Cross your arms in front of your chest. Alternatively, hold a medicine ball with arms extended ahead of you.
- Rotate from your core as you twist from side to side, keeping your hips square and feet planted on the ground.
- Perform 2 to 3 sets of 12 to 15 reps on each side.
RELATED: 4 Simple Changes That Burn Belly Fat Without Exercise After 40
Standing Side Bends
“Standing side bends strengthen lateral core muscles and support waist stability,” Canham explains.
- Stand tall, holding a dumbbell in your left hand by your side.
- Slowly bend at your waist toward the left, stretching your obliques as you do so.
- Return to standing.
- Repeat on the right side, holding a dumbbell in your right hand and bending to the right.
- Perform 2 to 3 sets of 10 to 12 reps on each side.
RELATED: 5 Walking Exercises That Flatten Your Stomach Better Than Gym Machines After 50
Standing Cross-Body Punches
“Standing cross-body punches engage the obliques and elevate heart rate slightly while maintaining core control,” Canham says.
- Stand tall with your feet hip-width apart and knees slightly bent.
- Bring your fists up to your chest or chin.
- Punch your left arm forward while maintaining relaxed shoulders and keeping your other hand at your chest.
- Return to the start.
- Repeat by punching your right arm forward.
- Continue to perform 2 sets of 20 alternating punches.
Standing Marches
“Standing marches with abdominal bracing train the deep core while reinforcing balance and posture,” Canham points out.
- Start by standing tall with your feet hip-width apart and arms at your sides.
- Lift your left knee up to hip height while swinging your right arm forward and left arm back. Keep your core engaged.
- Lower your foot and repeat with your right knee, swinging your left arm forward and right arm back.
- Maintain solid posture and steady breathing throughout.
- Perform 2 to 3 sets of 20 marching steps.
The post 5 Standing Exercises That Reduce Waist Thickening Faster Than Cardio After 55 appeared first on Eat This Not That.
]]>